Managing UI Widgets
To create a widget
-
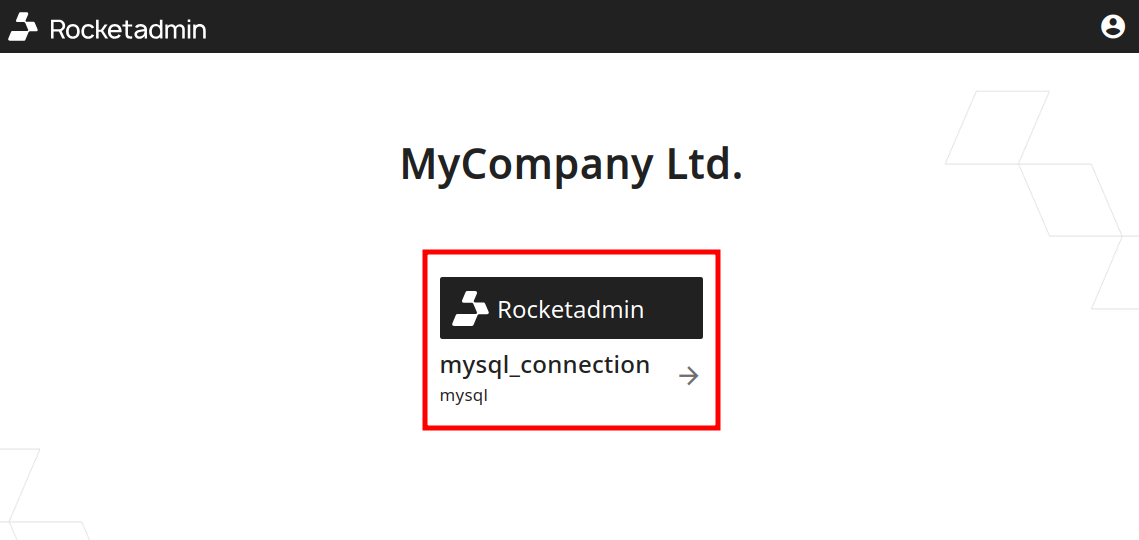
Sign in to your Rocketadmin account.
-
In the Dashboard click on a connection to open it:
-
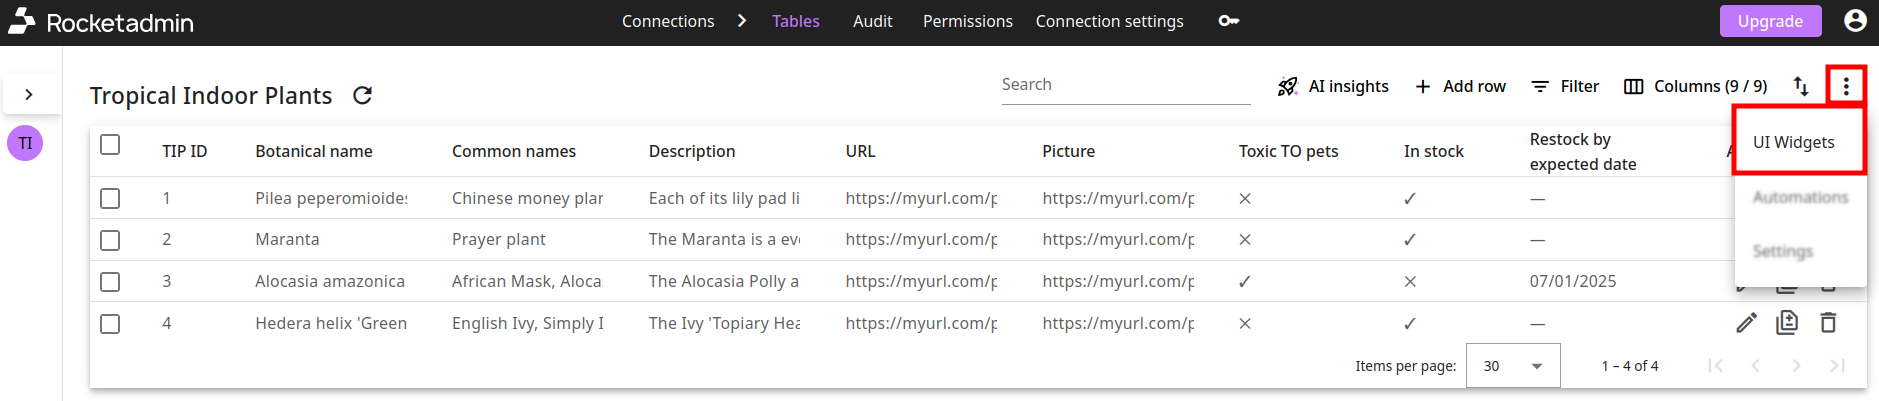
Click on and then on UI Widgets:
-
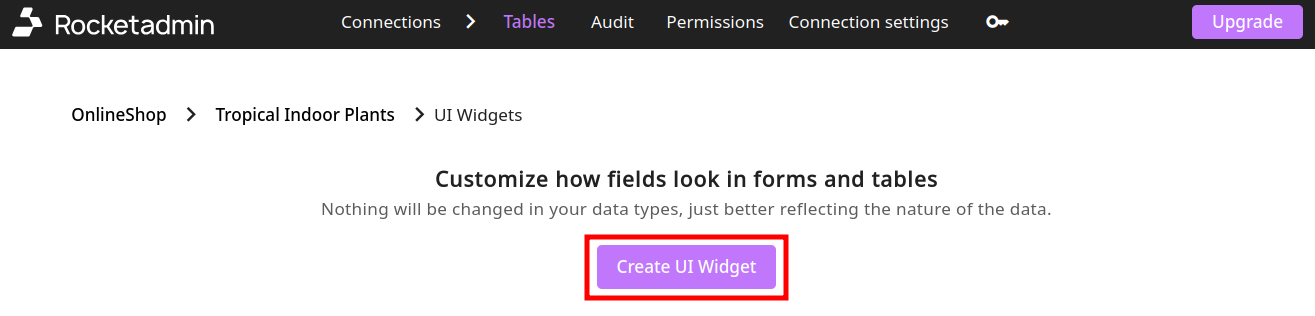
On the subsequent screen click on Create UI Widget:
-
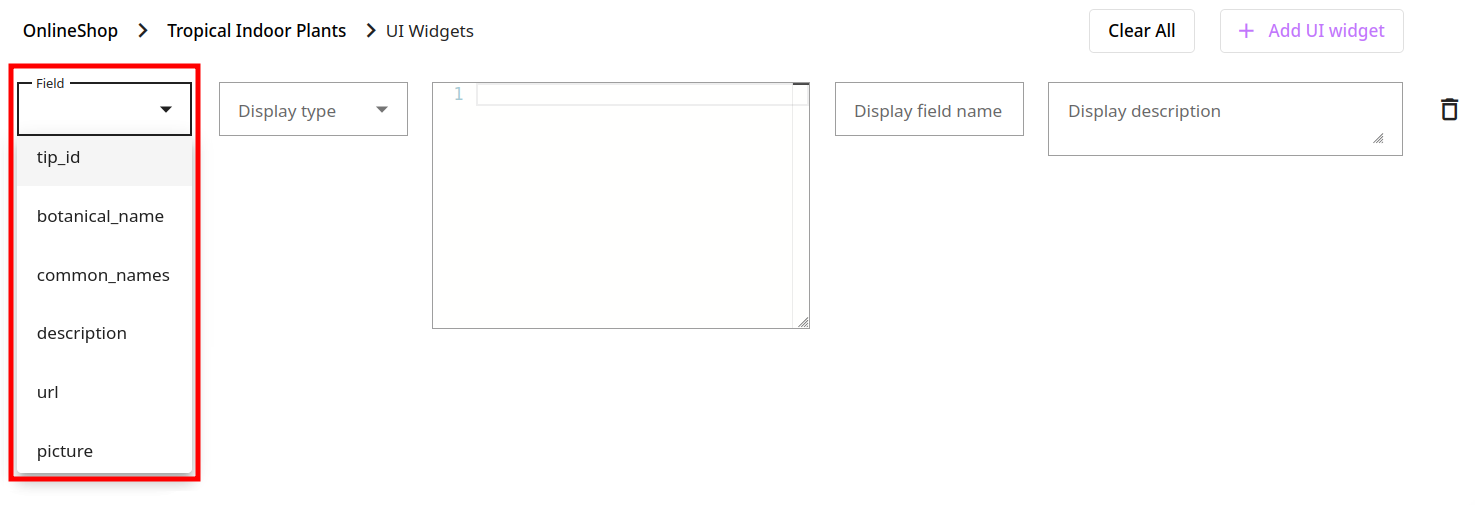
From the UI Widgets settings you can:
-
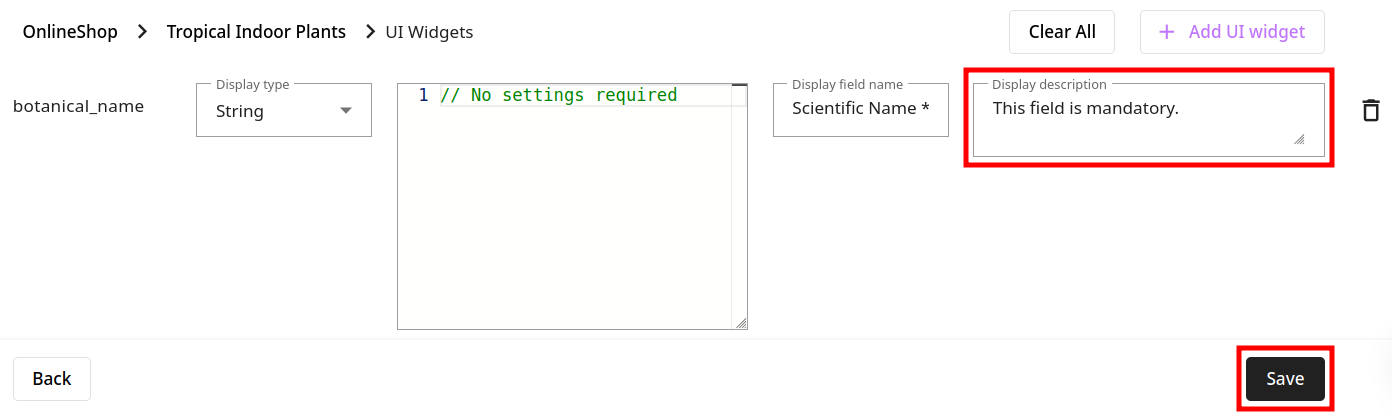
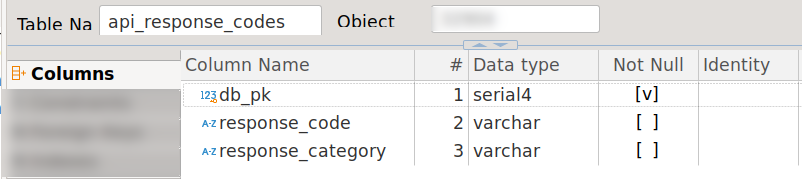
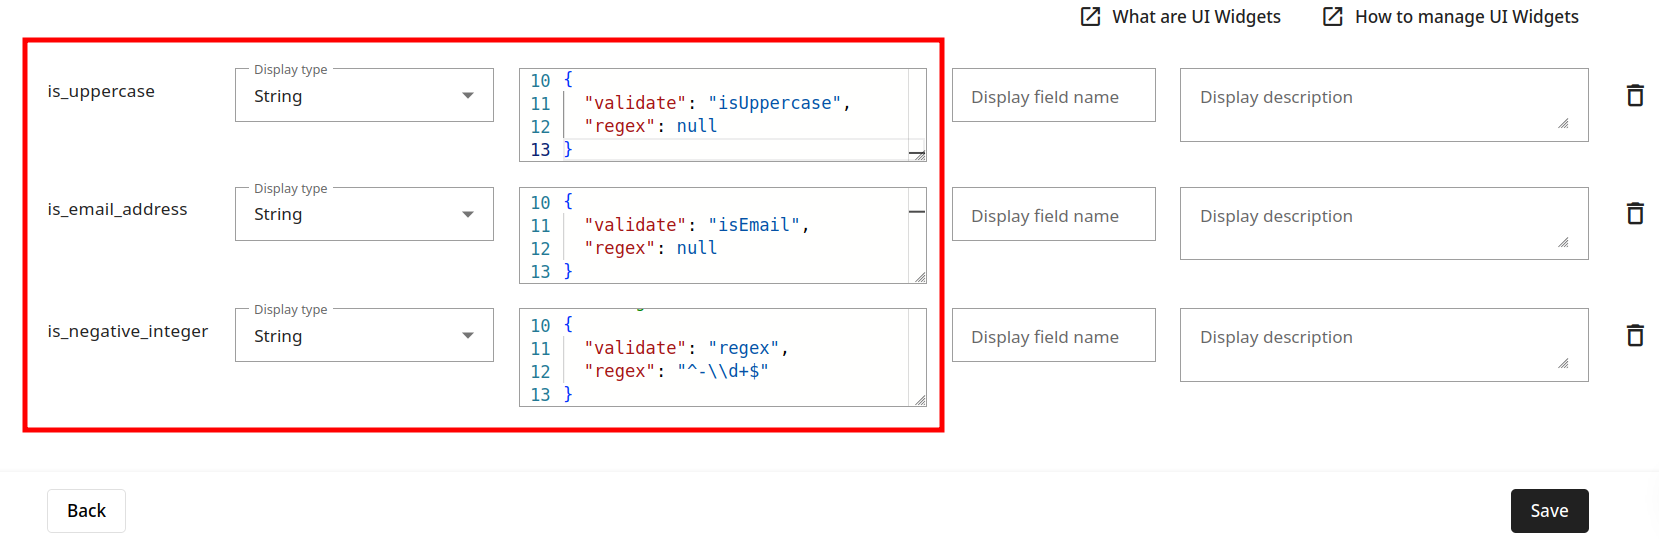
select a Field (table column)
-
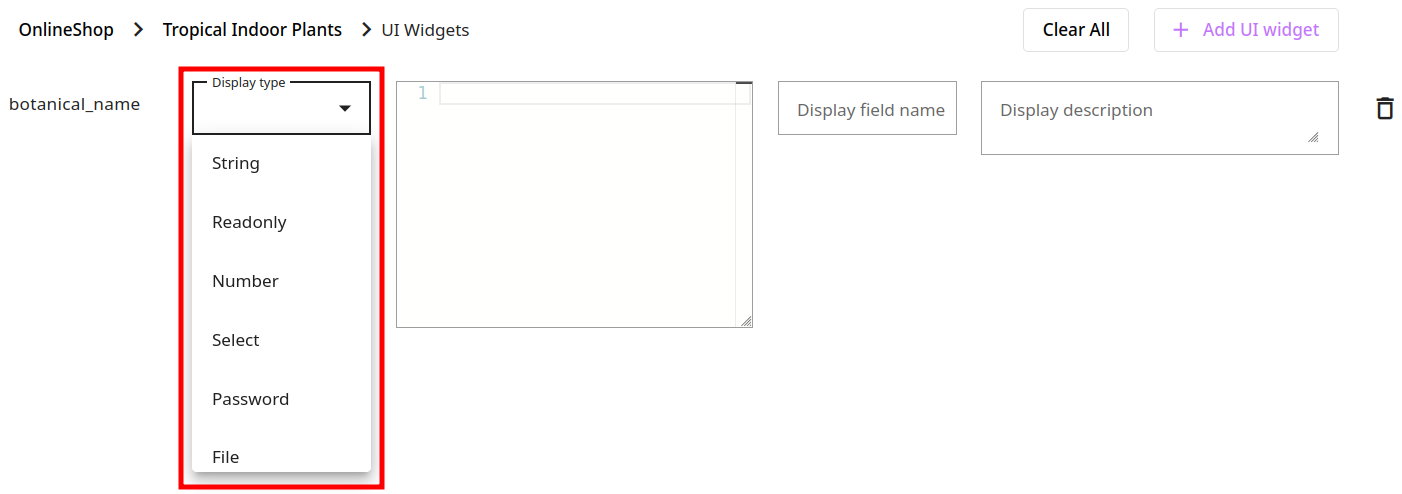
based on the database type of the field or on the type of data you plan to store in it, choose an appropriate Display type:
-
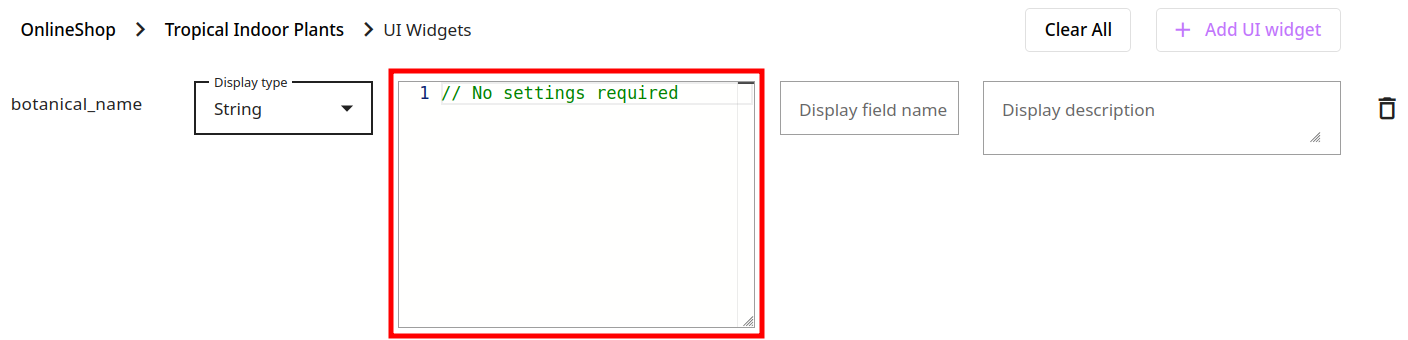
provide additional information (in case the settings are required):
-
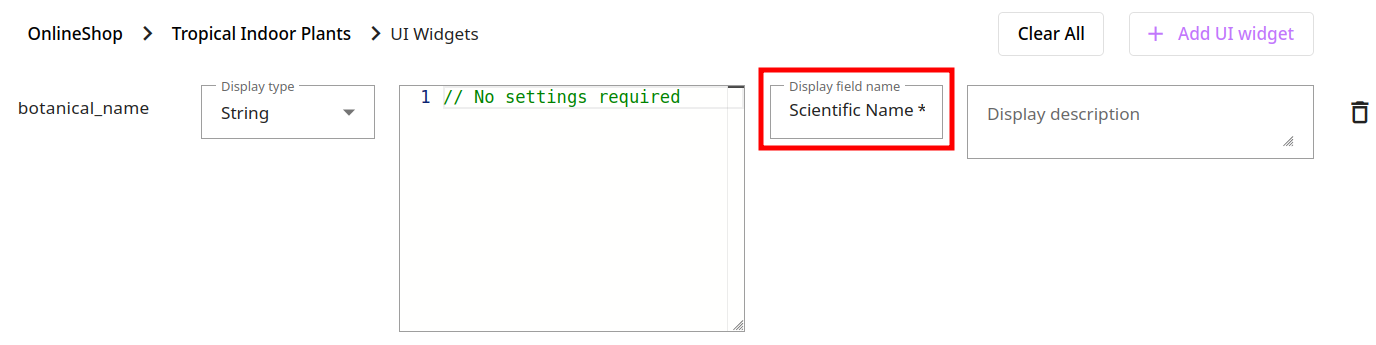
assign a different or more descriptive Display name to the field:
-
include further information (Display Description) to be visible on mouse over:
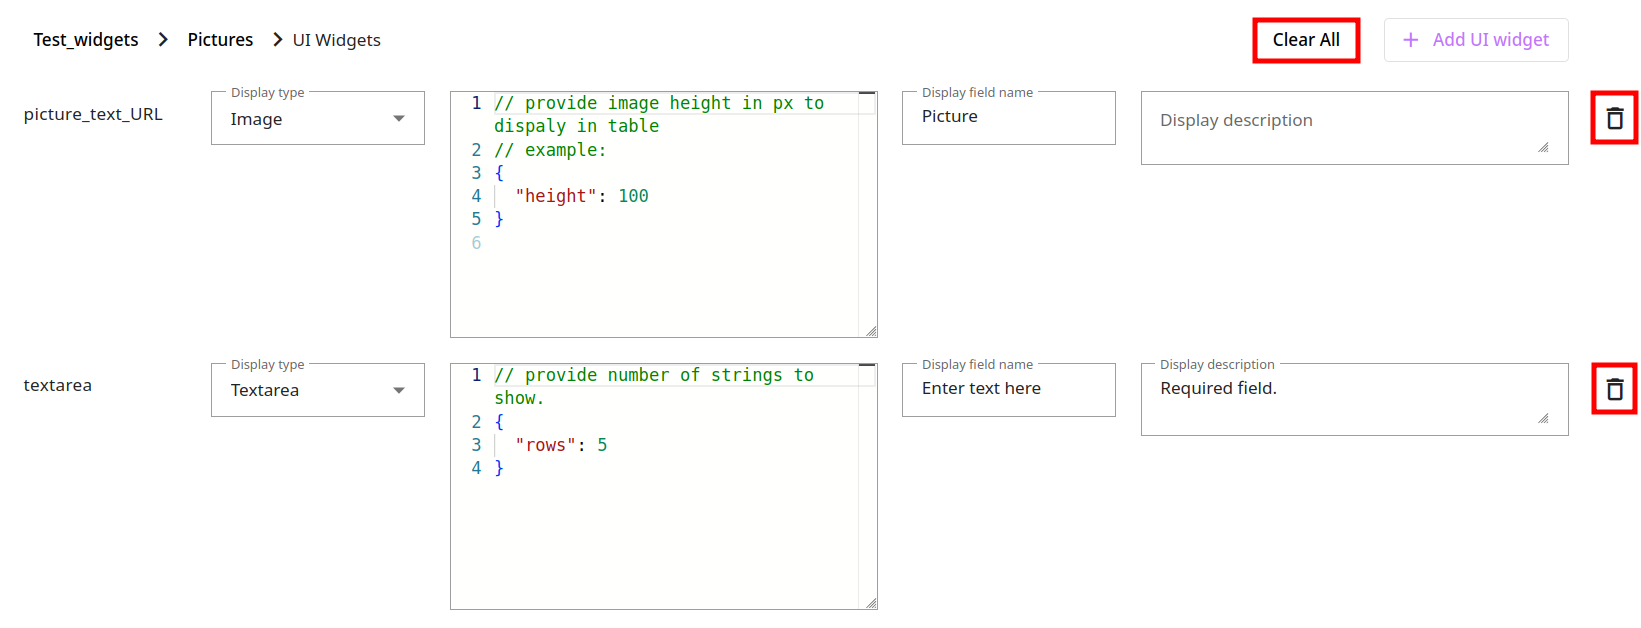
-
-
Save your changes.
-
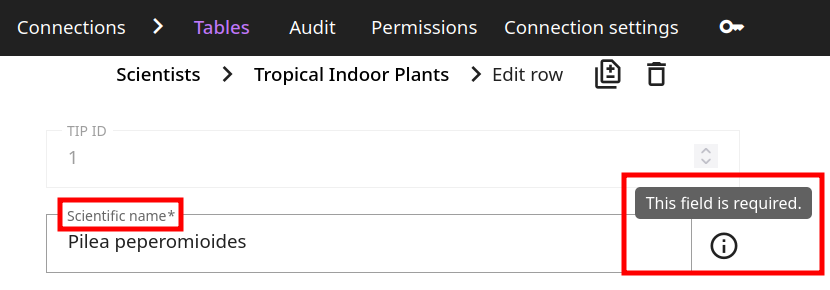
You can review the new settings once you open a record to edit:

Moving the mouse over will display the description:
Widgets configuration
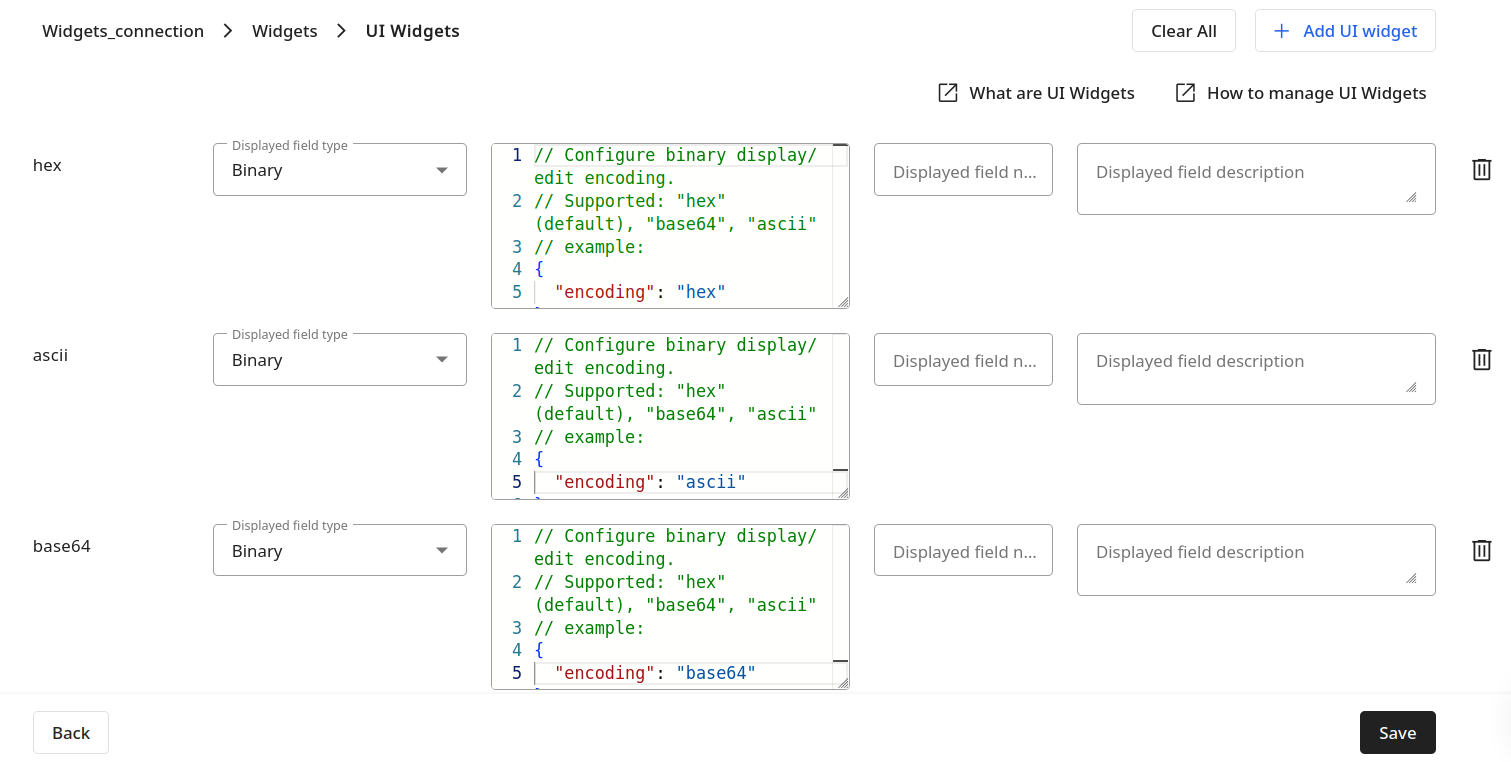
Binary
Using this widget, you can display and convert your HEX, Base64 and ASCII number values.
// Configure binary display/edit encoding.
// Supported: "hex" (default), "base64", "ascii"
// example:
{
  "encoding": "hex"
}
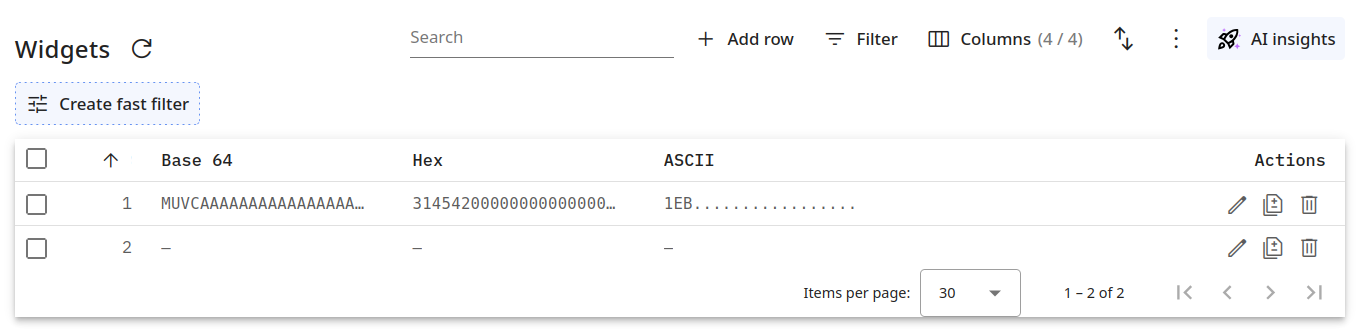
Example:
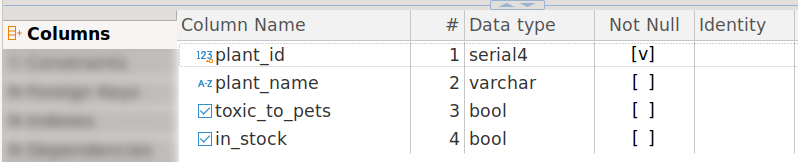
Considering database settings similar to the listed below
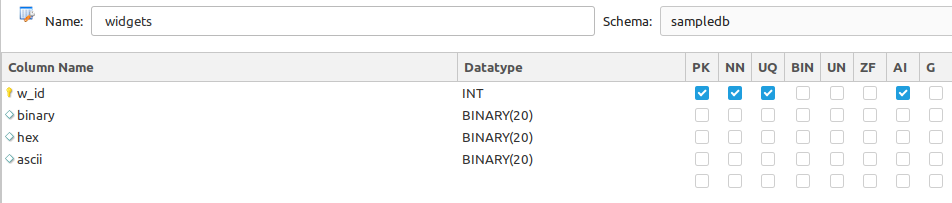
with the same value 1EB in all columns.
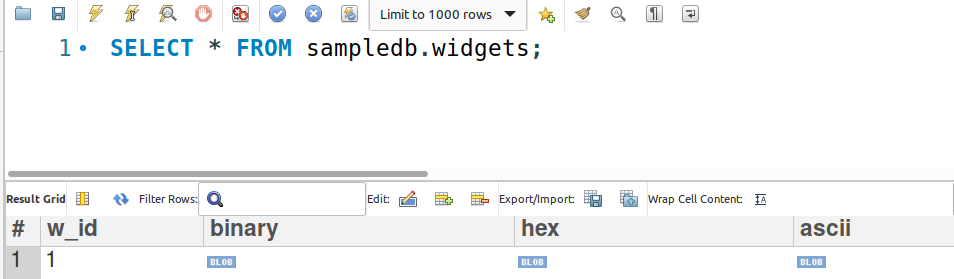
Without applying the Binary widget, your database will look as follows:

And after you configure the widget
the database values are converted
Boolean
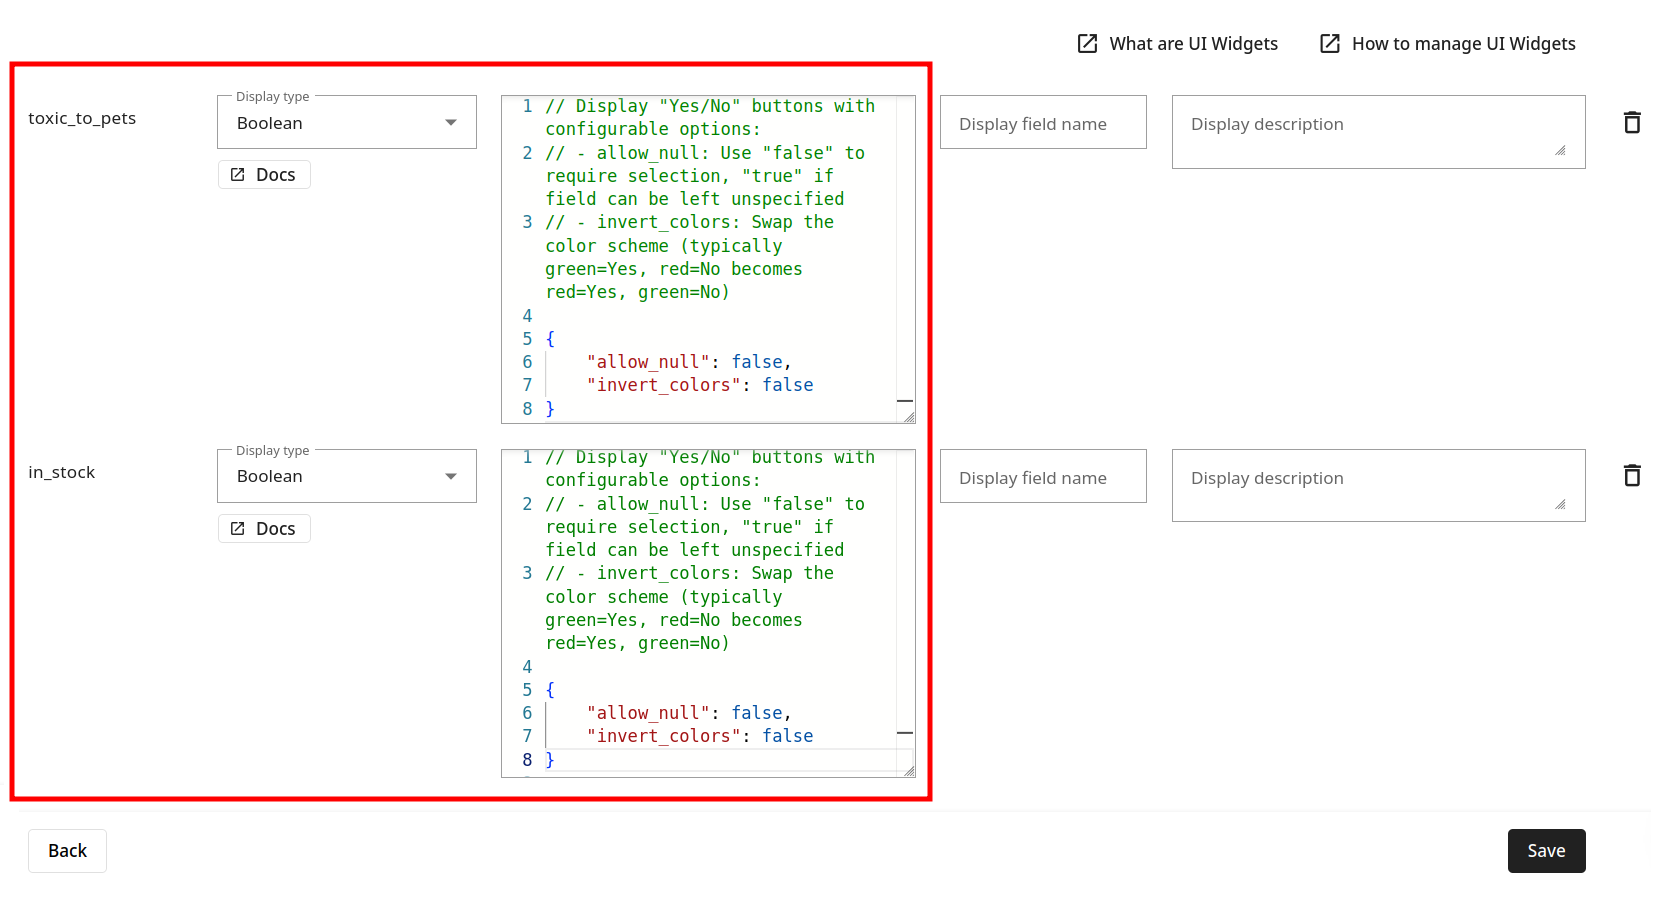
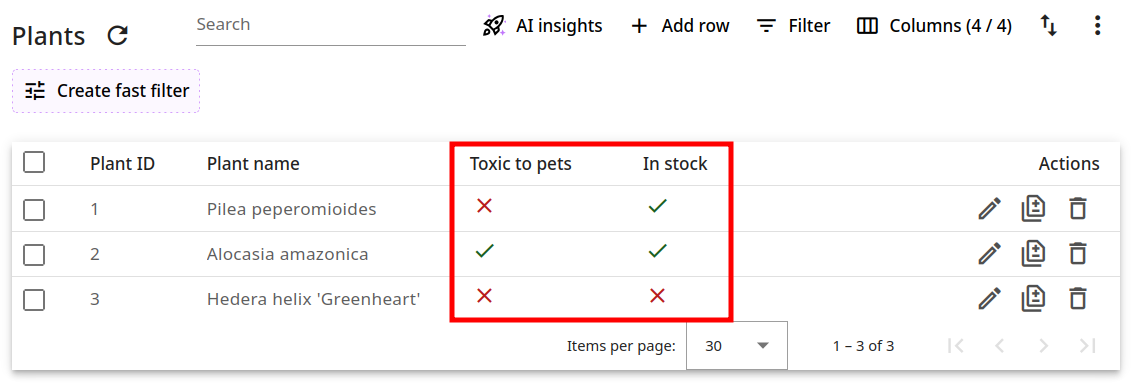
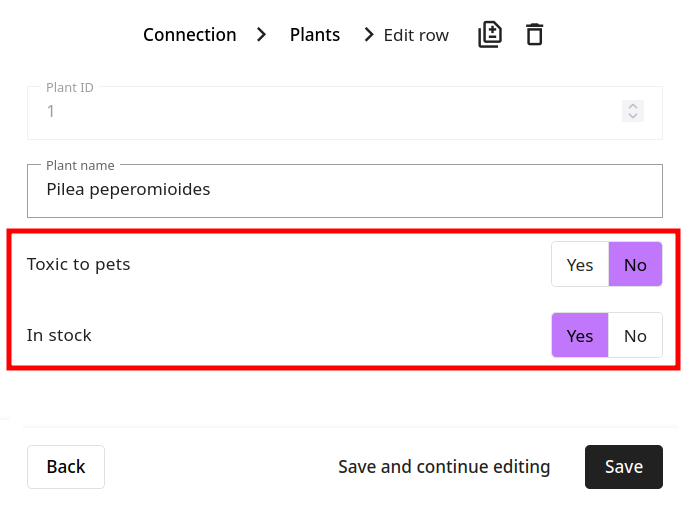
This widget gives you the ability to specify if the boolean selection is mandatory ("allow_null": false) and to switch the typical color scheme of green for True and red for False to indicate on/off or active/inactive states. When in edit mode, the values appear as user-friendly Yes/No buttons.
// Display "Yes/No" buttons with configurable options:
// - allow_null: Use "false" to require selection,
// "true" if field can be left unspecified
// - invert_colors: Swap the color scheme
// (typically green=Yes, red=No becomes red=Yes, green=No)

{
	"allow_null": false,
	"invert_colors": false
}
Example:
If your database settings resemble those listed below

with the boolean widgets applied
you can expect the following outcome
Code
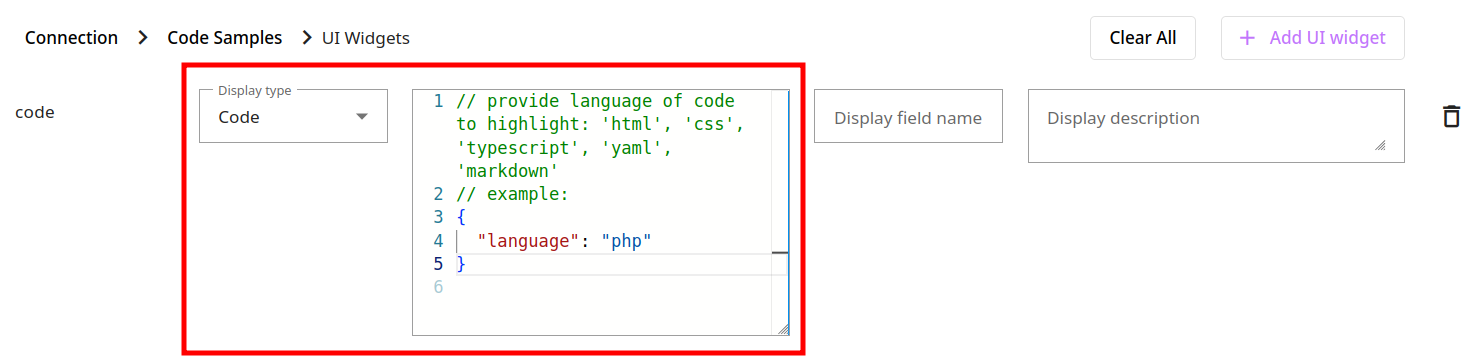
You can highlight and indent your source code fields with the help of this widget. Here you can find the full list of languages which are supported: https://microsoft.github.io/monaco-editor/
// provide language of code to highlight: 'html', 'css',
// 'typescript', 'yaml', 'markdown'
// example:
{
  "language": "php"
}
For JSON code, we suggest using our dedicated widget called JSON.
Example:
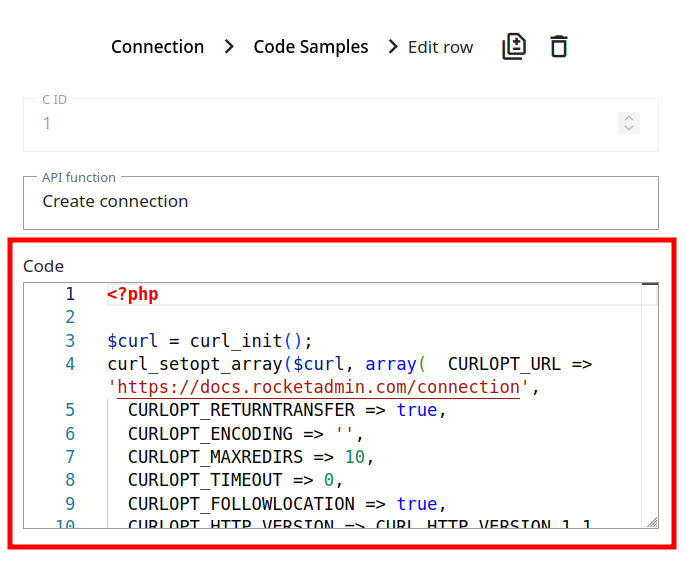
Before applying the Code widget:

After the widget is configured:
Color
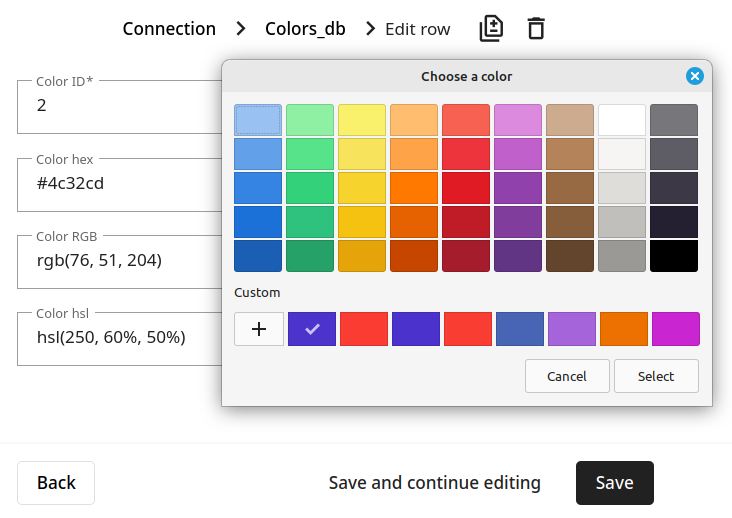
This widget can assist you in displaying different colors based on their code values (in HEX, RGB or HSL format). And in edit mode you can effortlessly switch between tones through a palette interface.
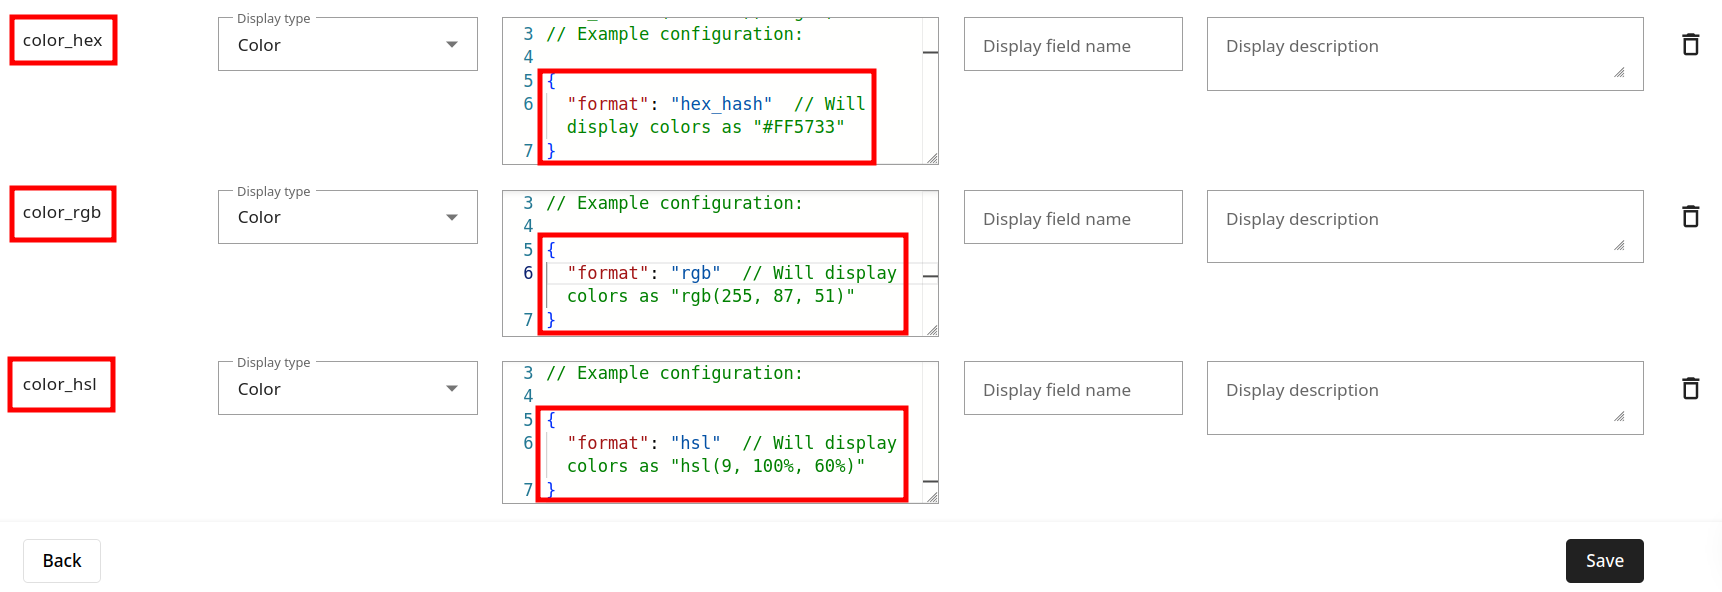
// Optional: Specify output format for color values
// Supported formats: "hex", "hex_hash" (default), "rgb", "hsl"
// Example configuration:

{
  "format": "hex_hash"  // Will display colors as "#FF5733"
}

// Format options:
// - "hex": Display as "FF5733" (no hash)
// - "hex_hash": Display as "#FF5733" (default)
// - "rgb": Display as "rgb(255, 87, 51)"
// - "hsl": Display as "hsl(9, 100%, 60%)"
Example:
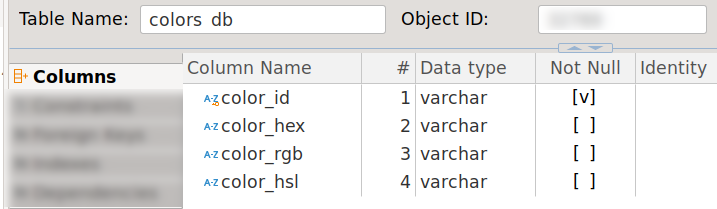
Considering the following database settings:

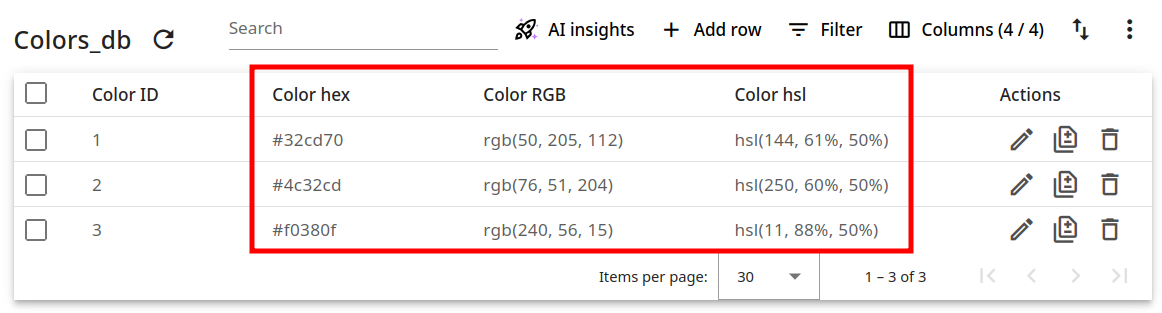
Without applying the Color widget, your database will look as follows:
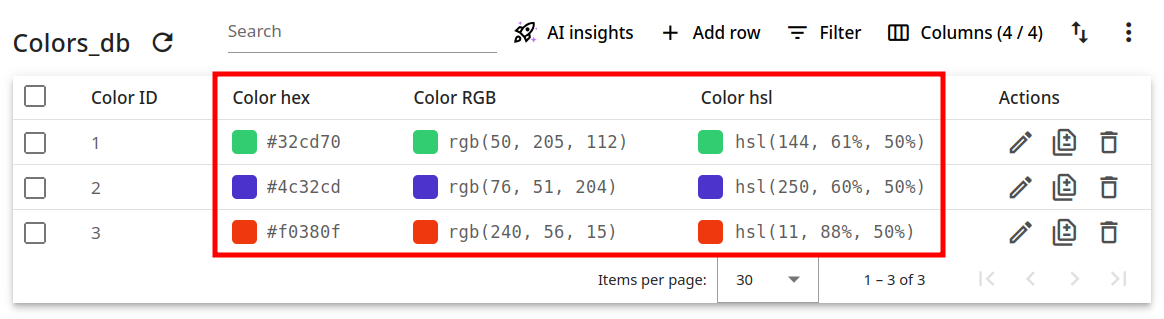
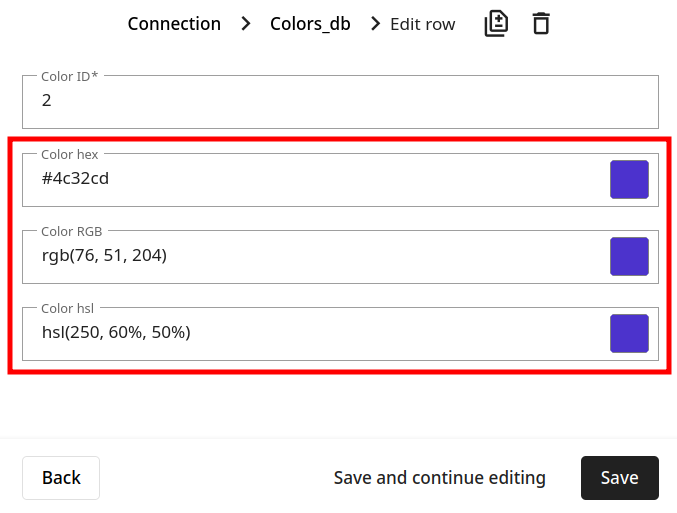
And after you configure the widget:
the improved display enables you to change colors using a palette (in edit mode):
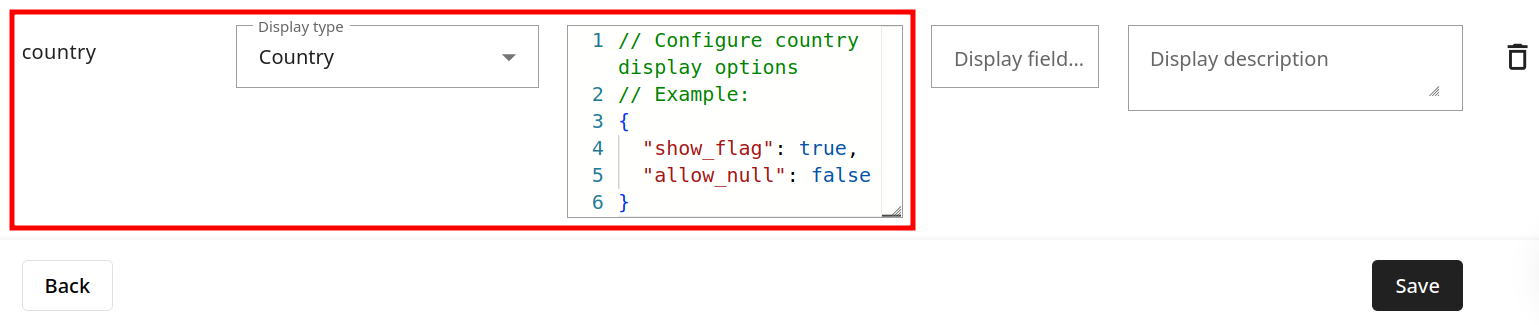
Country
Using this widget, you can "transform" the country codes from your database into their corresponding country names and even display their flags:
// Configure country display options
// Example:
{
  "show_flag": true,
  "allow_null": false
}
Example:
Considering the following database settings:
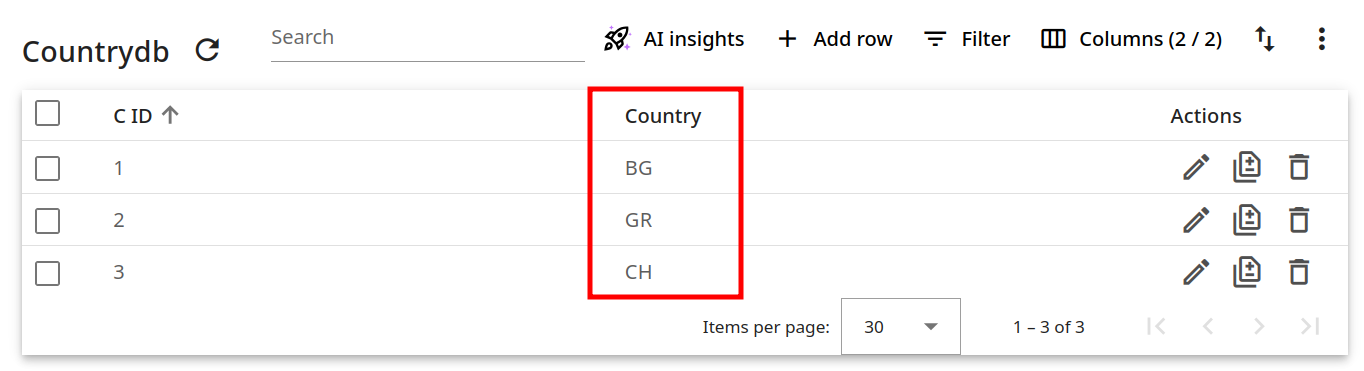
Without applying the Country widget, your database will look as follows:
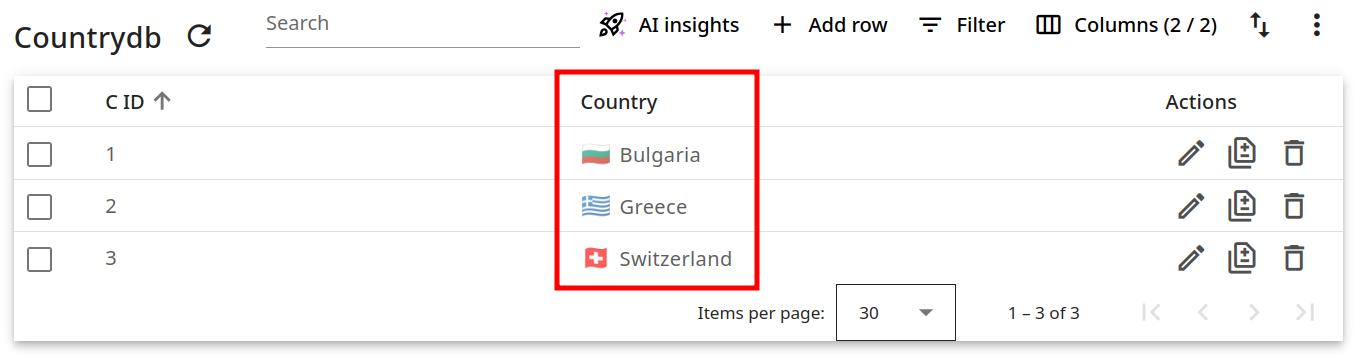
And after you configure the widget:
the countries will be presented with their full name and flag:
Date/Datetime
Sometimes you may want to display how much time has passed since a given date and time. For example, when an event occurred two hours ago, the database field can display this as relative time.
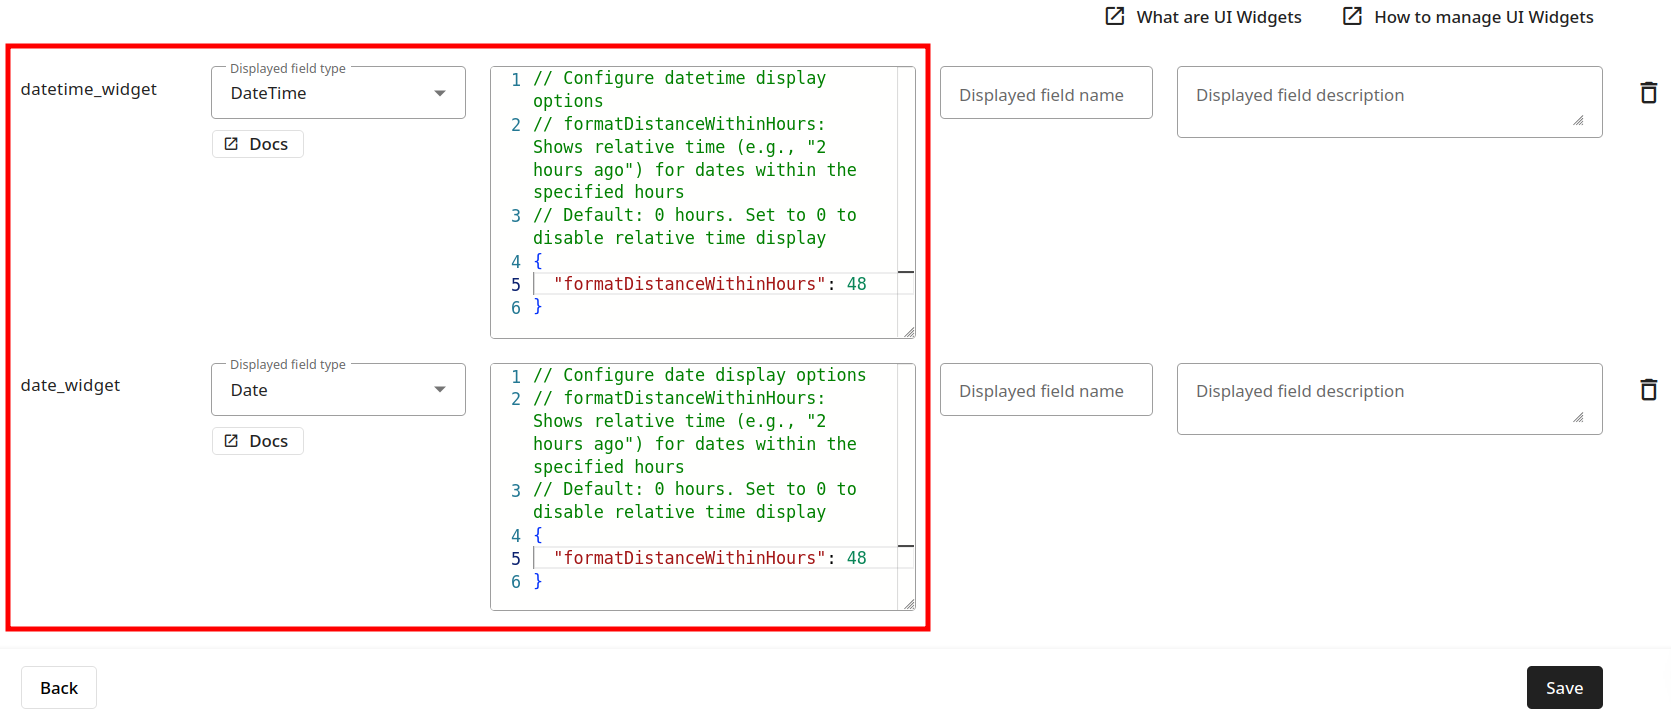
For Date and DateTime widgets you can set parameter formatDistanceWithinHours (or maximum number of hours) within which relative time is automatically calculated.
If the date/datetime values are outside the defined range, the field remains unchanged.
For example, if formatDistanceWithinHours is set to 48:
- Dates within the last 48 hours are shown as 1 hour ago, 2 hours ago, etc.
- Dates older than 48 hours display the original date and time
Setting the "formatDistanceWithinHours" value to "0" deactivates the function.
// Configure date/datetime display options
// formatDistanceWithinHours: Shows relative time (e.g., "2 hours ago")
// for dates within the specified hours
// Default: 0 hours. Set to 0 to disable relative time display
{
  "formatDistanceWithinHours": 0
}
Example:
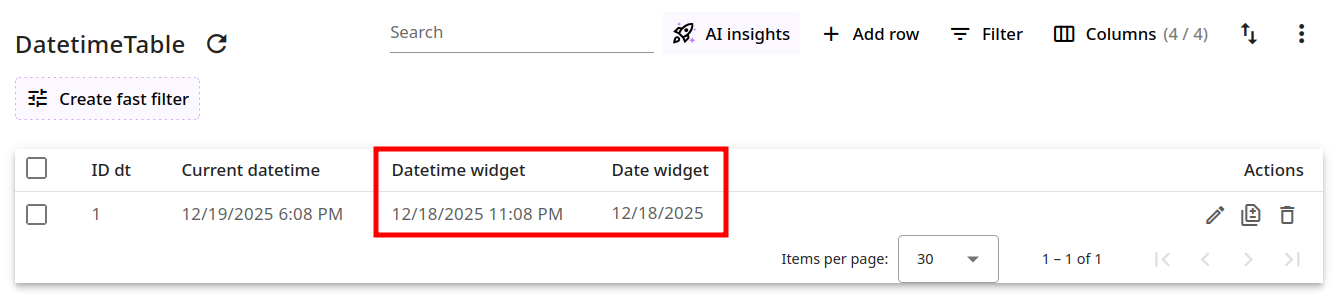
Considering the following database settings:
Without applying the Date/Datetime widgets, there will be no change to the values in your columns:
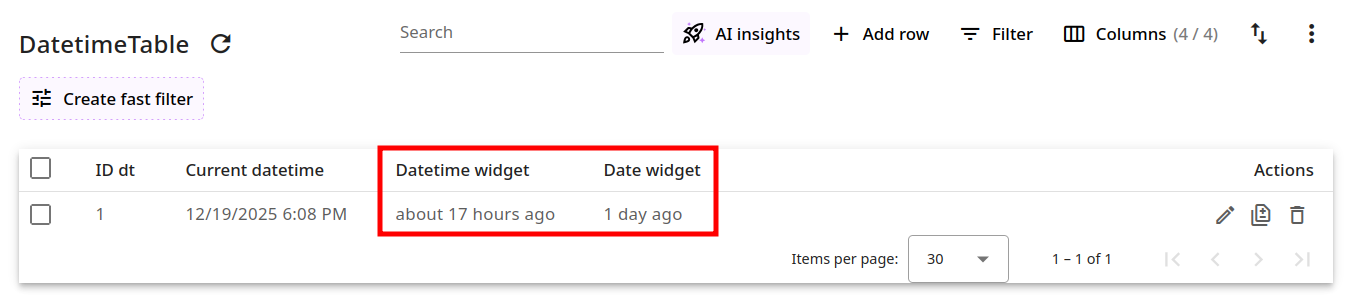
And after you configure the widgets:
Rocketadmin will display the approximate number of hours/days that have passed:
Foreign key
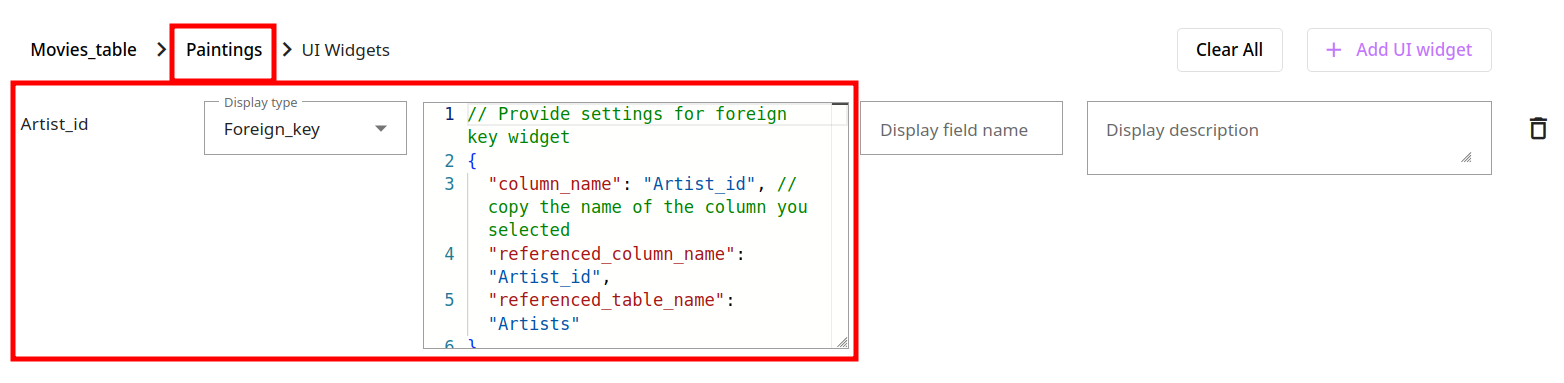
In general, this widget is designed to help you mimic the Foreign key concept for non-relational databases. And in certain rare cases of relational databases, it can also help you create imaginary links between tables that are not directly associated through primary and foreign keys. You need to add the values of the following parameters - column_name of the first table which you want to link to the referenced_column_name of the second table (or the referenced_table_name):
// Provide settings for foreign key widget
{
  "column_name": "Artist_id", // copy the name of the column you selected
  "referenced_column_name": "Artist_id",
  "referenced_table_name": "Artists"
}
Example:
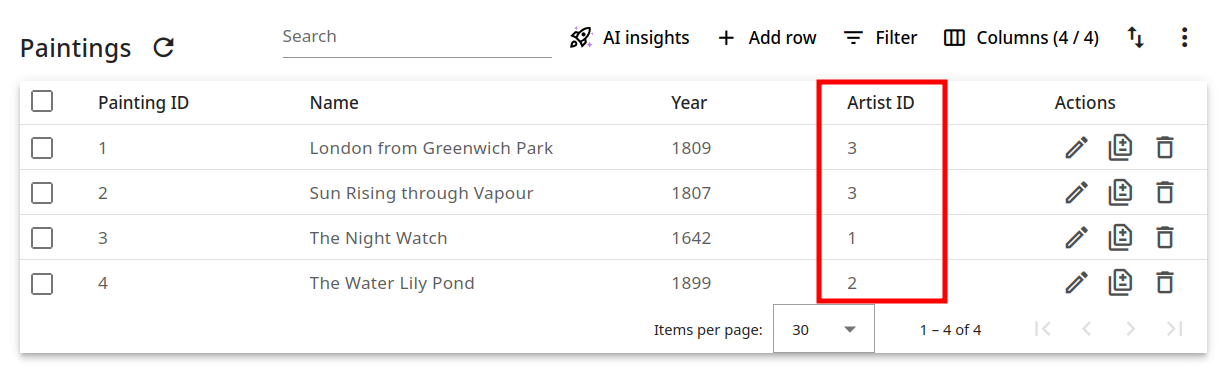
Two NoSQL tables - Artists and Paintings, are supposed to be "linked" by the column Artist_id:
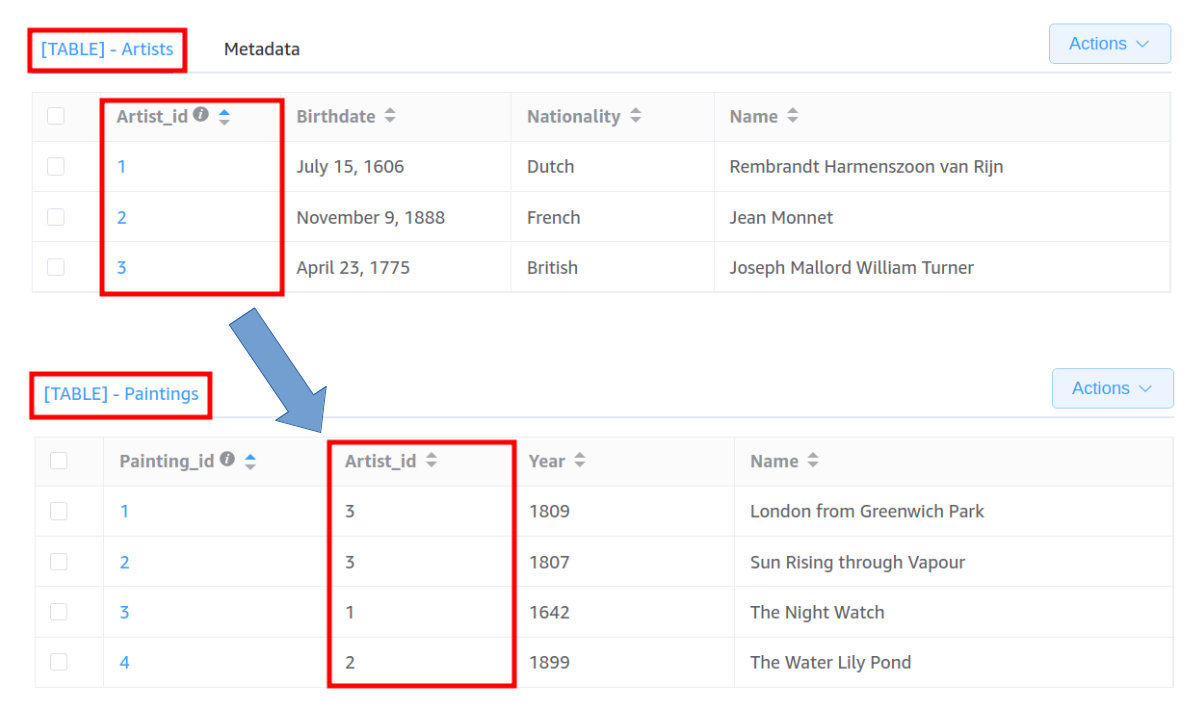
However, this relationship is not established automatically and therefore you cannot display the related record by clicking on an Artist_id:
To fully enable foreign key functionality in no-SQL databases, it is necessary to set up the Foreign key widget for the Paintings table as follows:
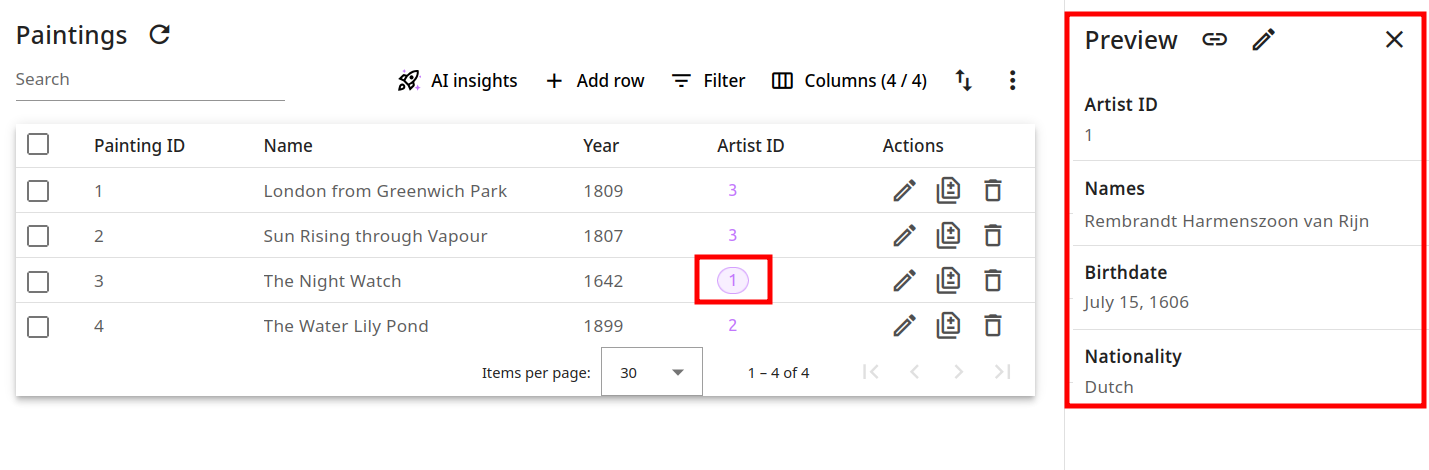
After that, you will be able to click on an Artist_id value and review the linked record on the right side panel:
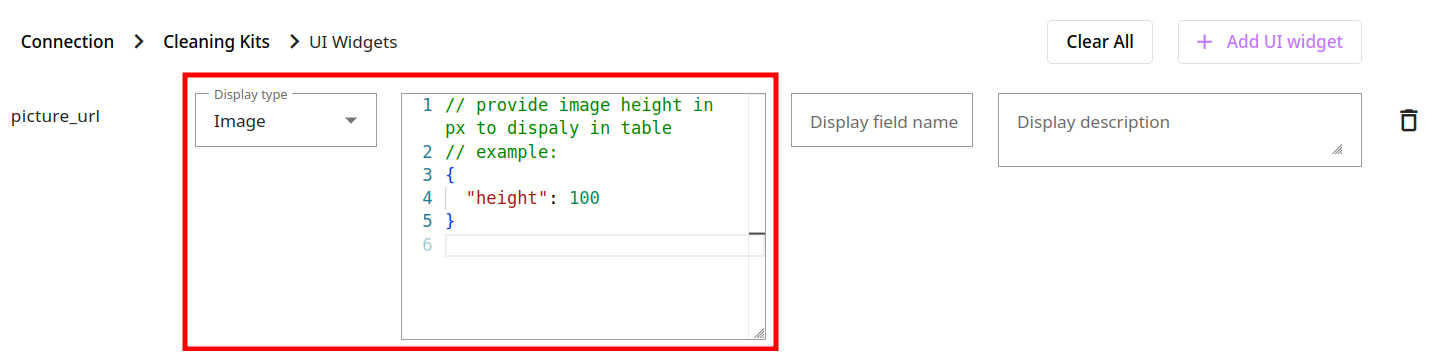
Image
The Image widget enables you to see a preview of the pictures whose URLs are kept in specific table fields. Additionally, you can configure the pictures height and URL prefix:
// provide image height in px to dispaly in table
// prefix: optional URL prefix to prepend to image source
// example:
{
  "height": 100,
  "prefix": "https://example.com/images/"
}
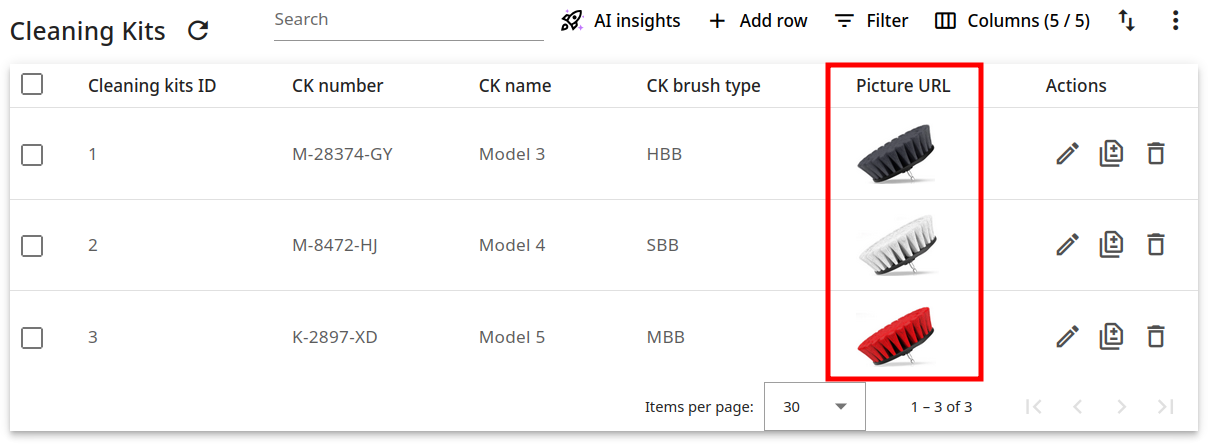
Example:
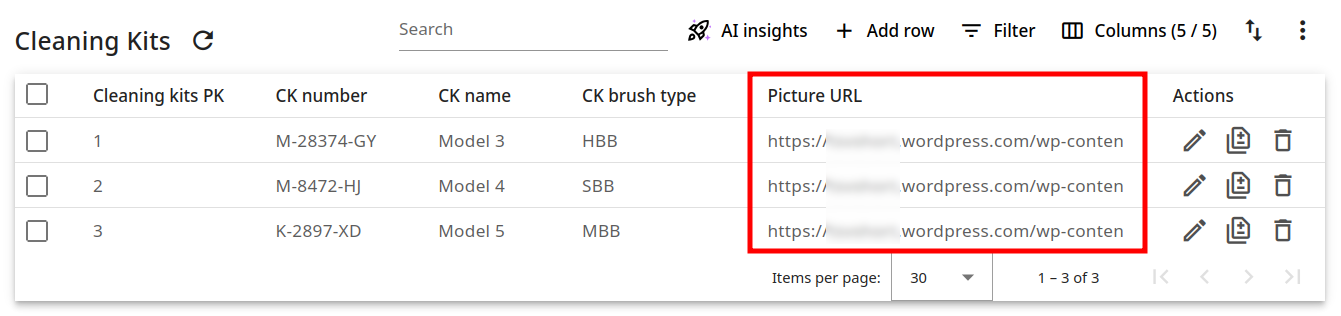
Before applying the Image widget:
After the widget is configured:
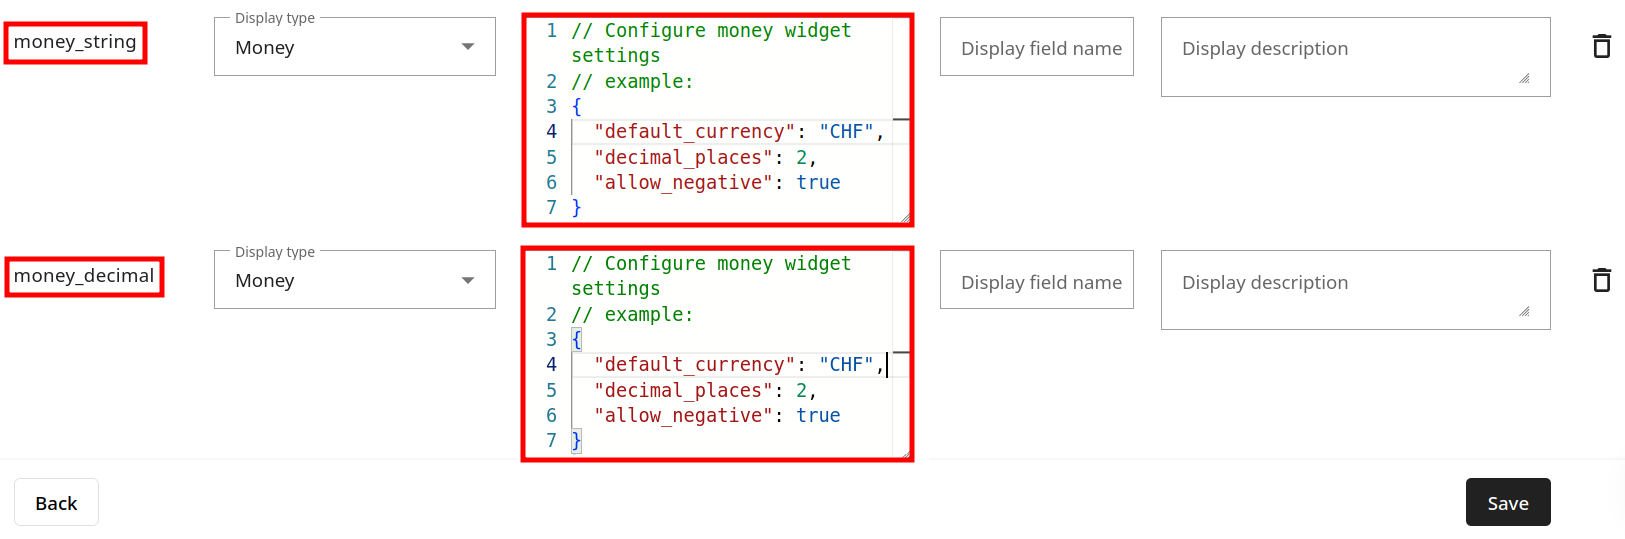
Money
The Money widget allows you to present standard currency fields featuring the currency code (the three-letter ISO code) along with the currency value, which may be in numeric format or even stored as a string.
// Configure money widget settings
// example:
{
  "default_currency": "CHF",
  "decimal_places": 2,
  "allow_negative": true
}
Example:
Considering the following database settings:
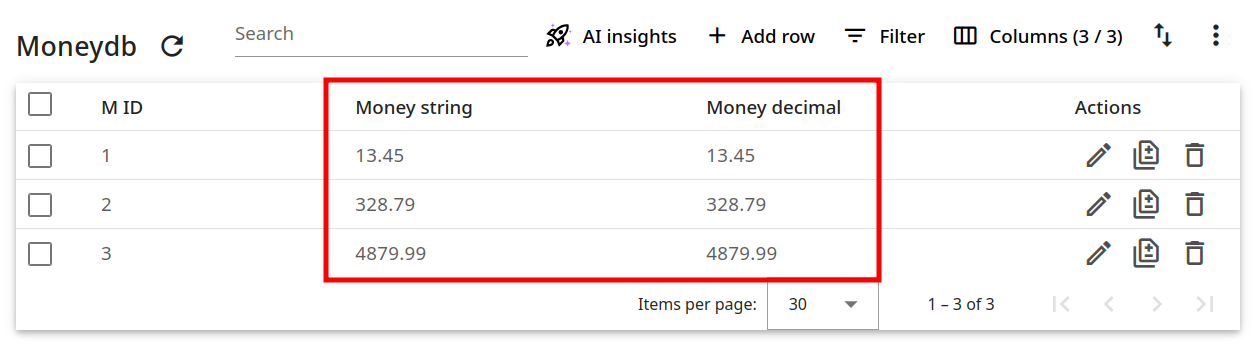
Without applying the Money widget, your database will look as follows:
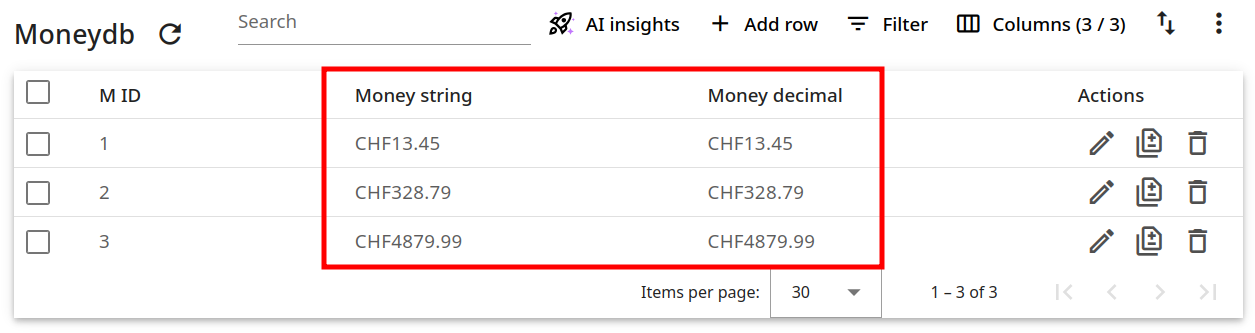
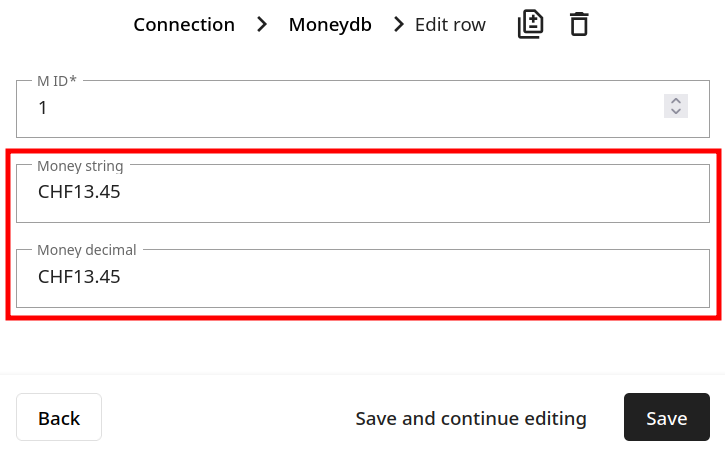
And after you configure the widget:
the database fields will include the currency code:
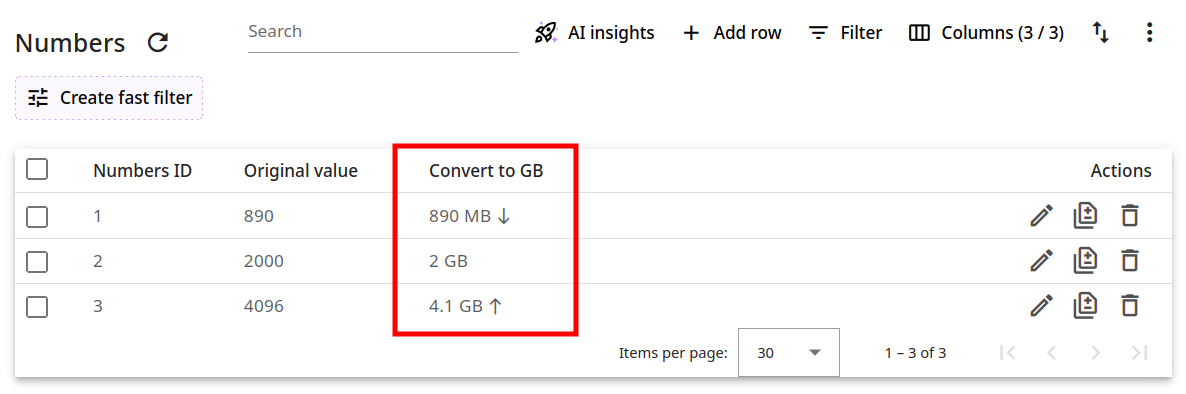
Number
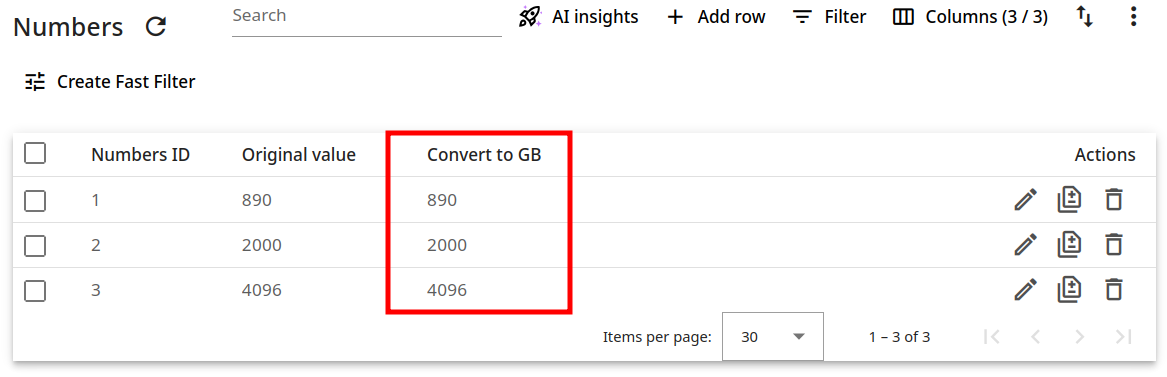
Using this widget, you can display and/or convert (if possible to nearest higher unit) your number values in different predefined units, such as bytes, meters, seconds, grams. You are also able to define thresholds outside of which the values will be highlighted.
// Configure number display with unit conversion and threshold validation
// Example units: "bytes", "meters", "seconds", "grams"
// threshold_min/threshold_max: Values outside these limits will be highlighted
{
  "unit": null,
  "threshold_min": null,
  "threshold_max": null
}
Example:
Considering the following database settings:
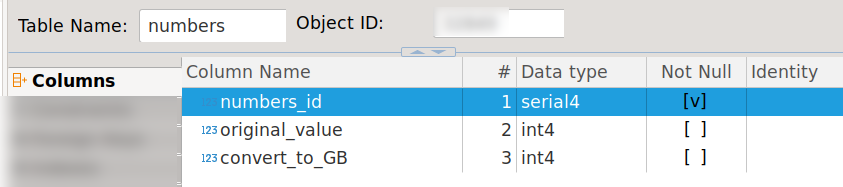
Without applying the Number widget, your database will look as follows:
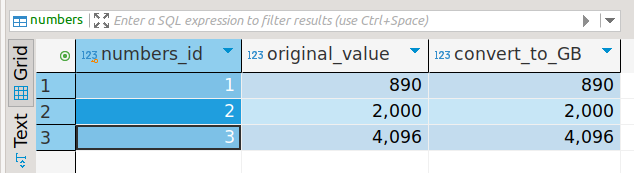
And after you configure the widget:
the database values are converted and include the unit abbreviation:
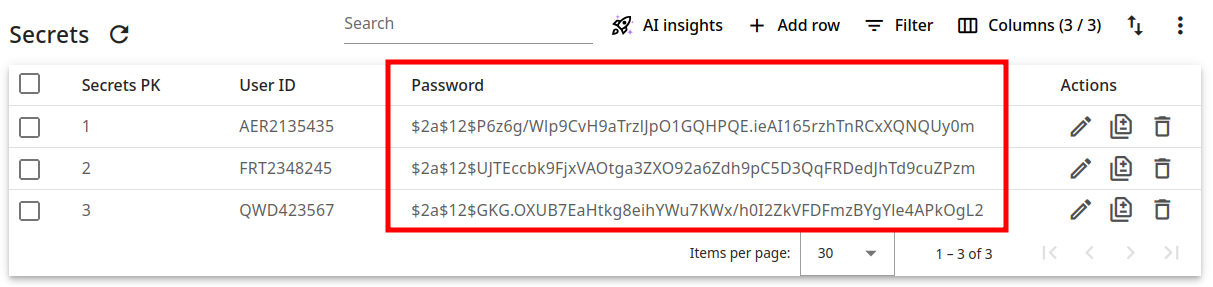
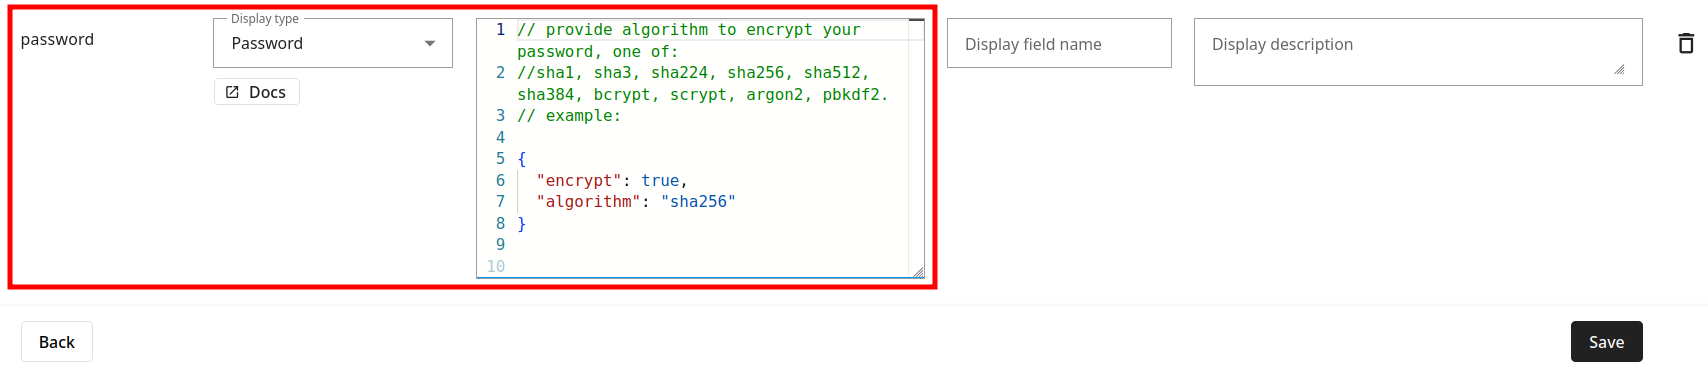
Password
This widget can help you encrypt your password fields using different algorithms:
// provide algorithm to encrypt your password, one of:
//sha1, sha3, sha224, sha256, sha512, sha384, bcrypt, scrypt, argon2, pbkdf2.
// example:

{
  "encrypt": true,
  "algorithm": "sha256"
}
Example:
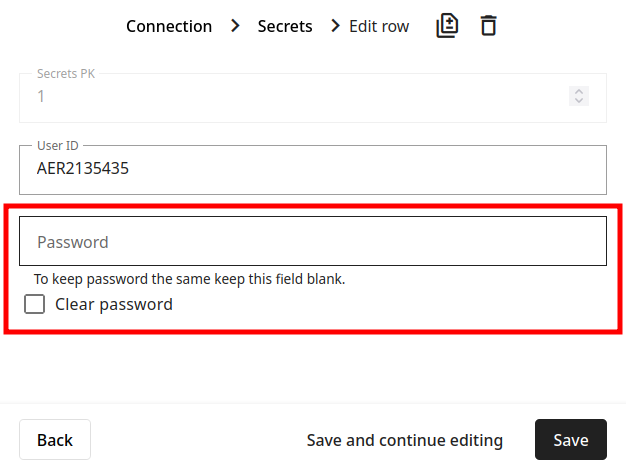
Before applying the Password widget:
After the widget is configured:
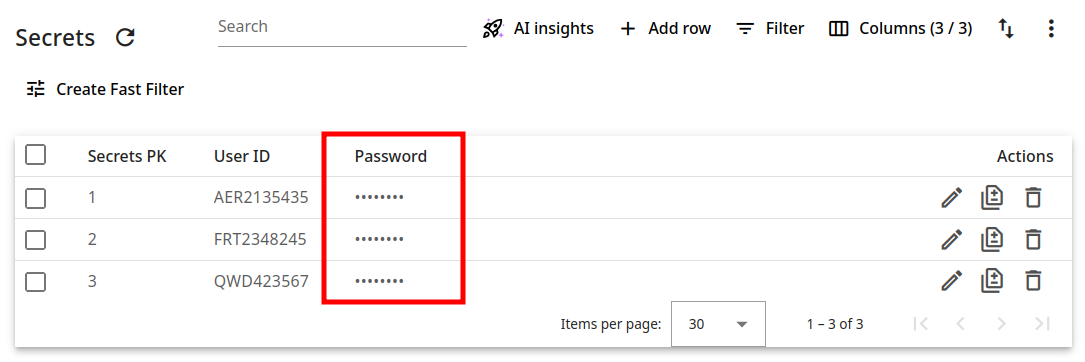
In edit mode the password remains hidden (it simply shows as an empty field). In case you want to delete it, mark the option Clear password:
Phone
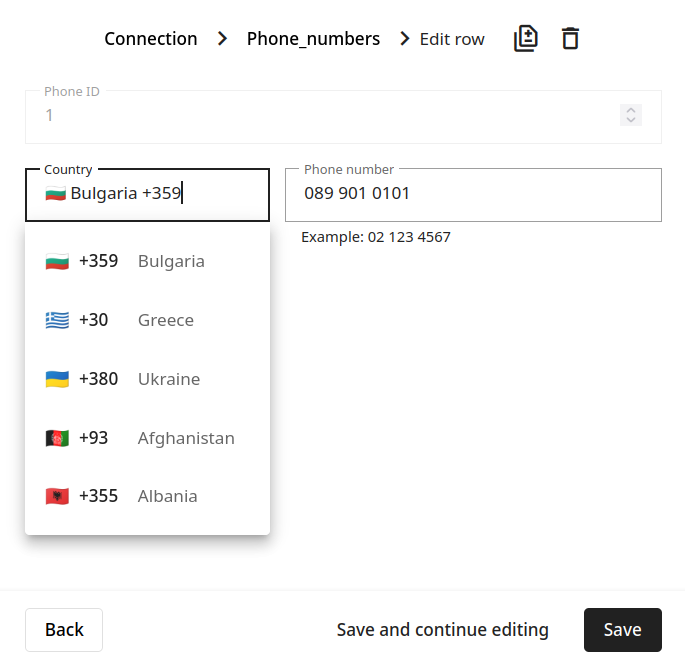
With the help of this widget you can display international phone numbers along with the country codes in a more readable format:
// Configure international phone number widget
// example:
{
  "preferred_countries": ["BG", "UA", "GR"],
  "enable_placeholder": true,
  "phone_validation": true
}
Example:
Considering the following database settings:

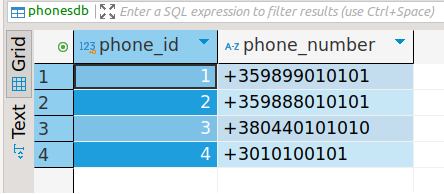
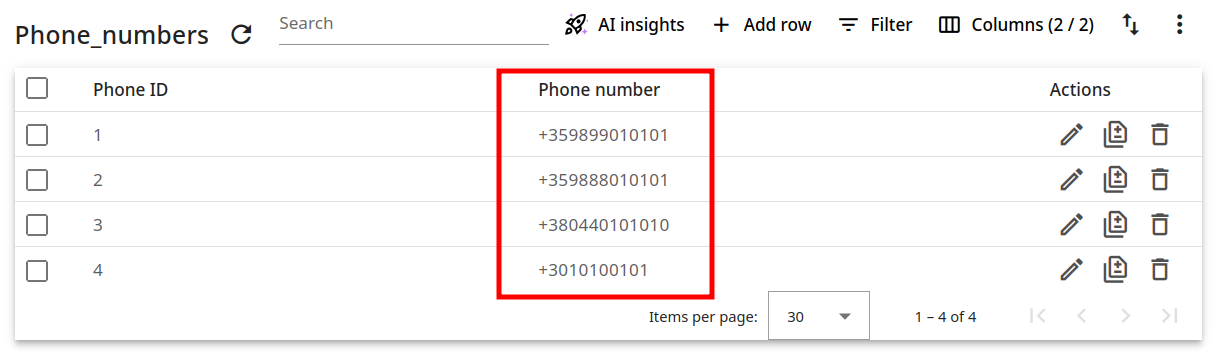
Without applying the Phone widget, your database will look as follows:
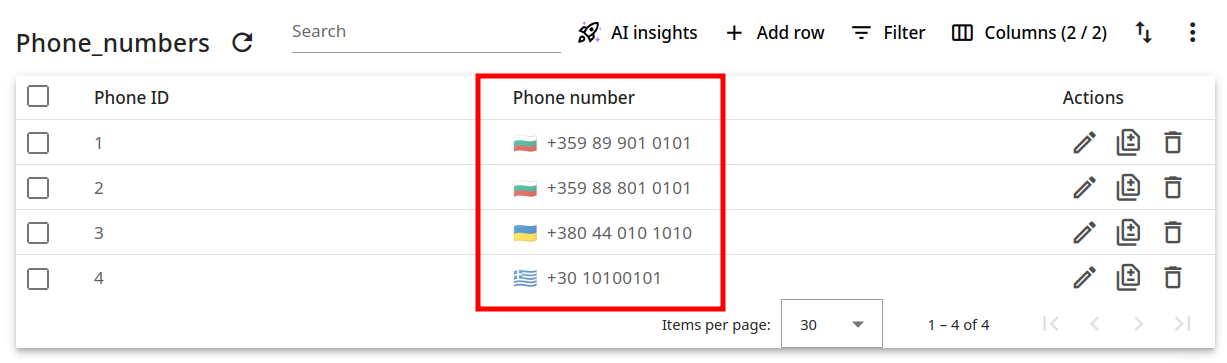
And after you configure the widget:

the improved display (main and edit view) also includes country flags:
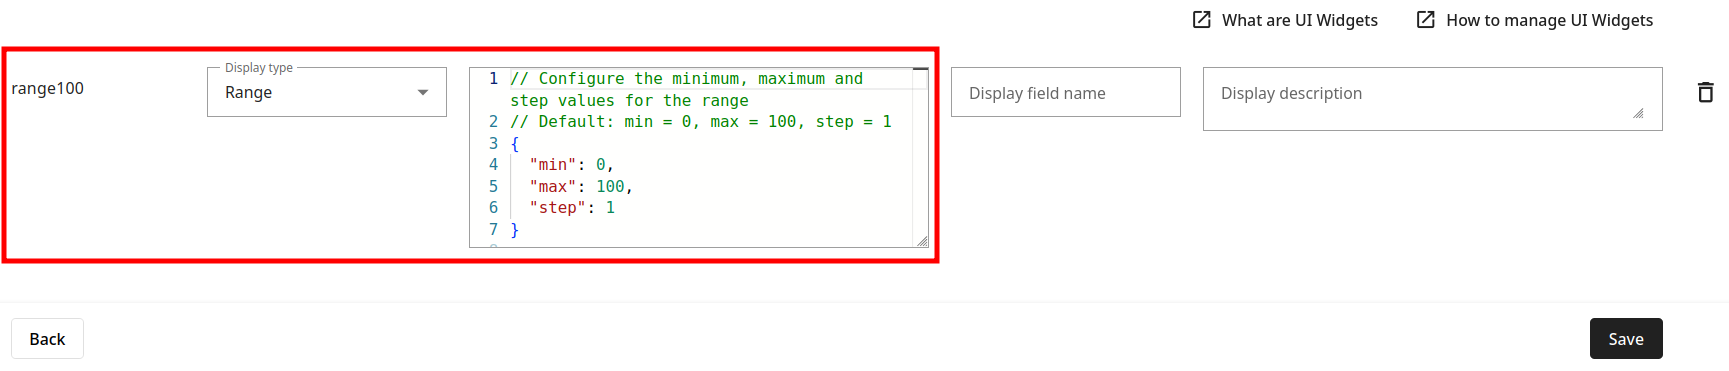
Range
You can use this widget to effortlessly manage range values and present them in a more understandable format. The settings that can be configured include minimum, maximum, and step values:
// Configure the minimum, maximum and step values for the range
// Default: min = 0, max = 100, step = 1
{
  "min": 0,
  "max": 100,
  "step": 1
}
Example:
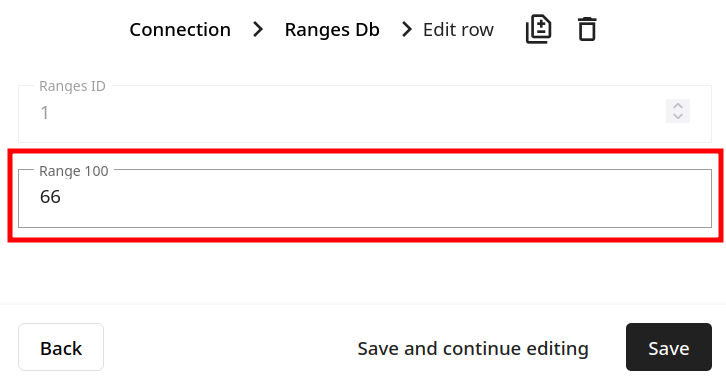
Considering the following database settings:
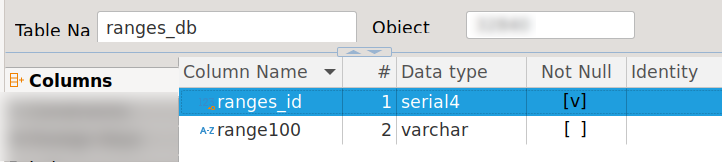
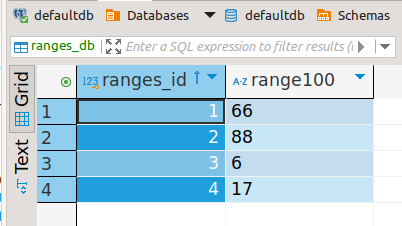
Without applying the Range widget, your database will look as follows (main and edit view):
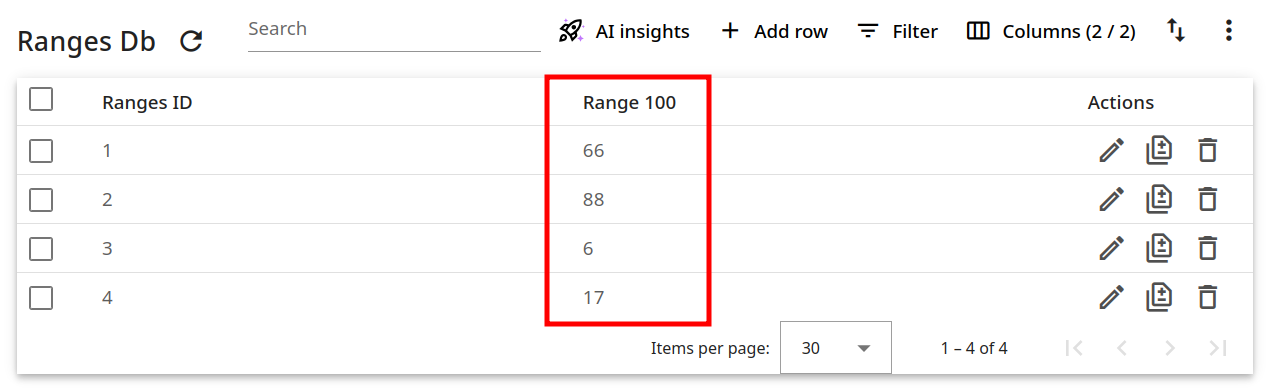
Once you have set up the widget,
the range values are displayed in a more user-friendly manner (main and edit view):
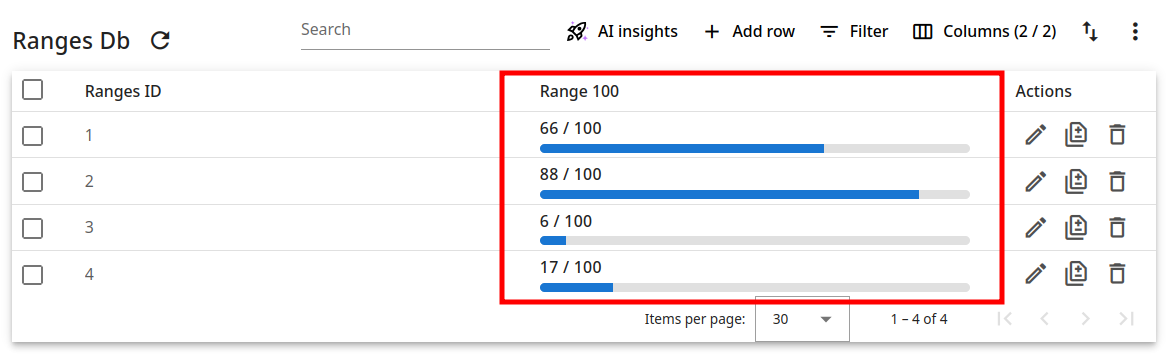
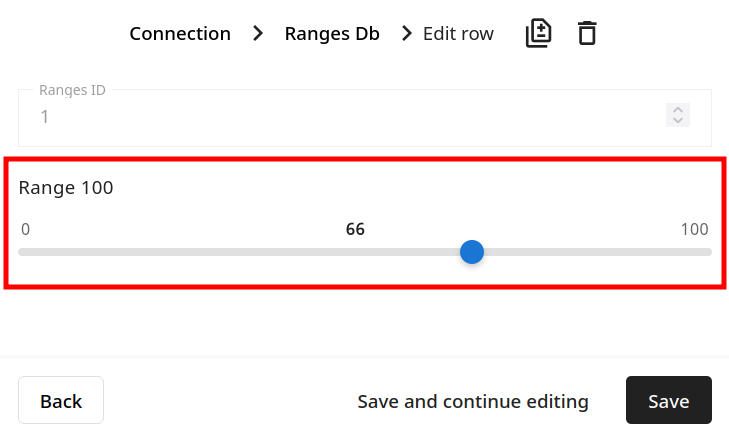
You can easily change values with the slider and then click on Save to store the new number.
Select
You can connect column values to specific words (and/or add emojis) that hold more meaning, allowing you to change table cells by selecting from the set of predefined values. The equivalent of select in programming languages is the enum (enumeration) type.
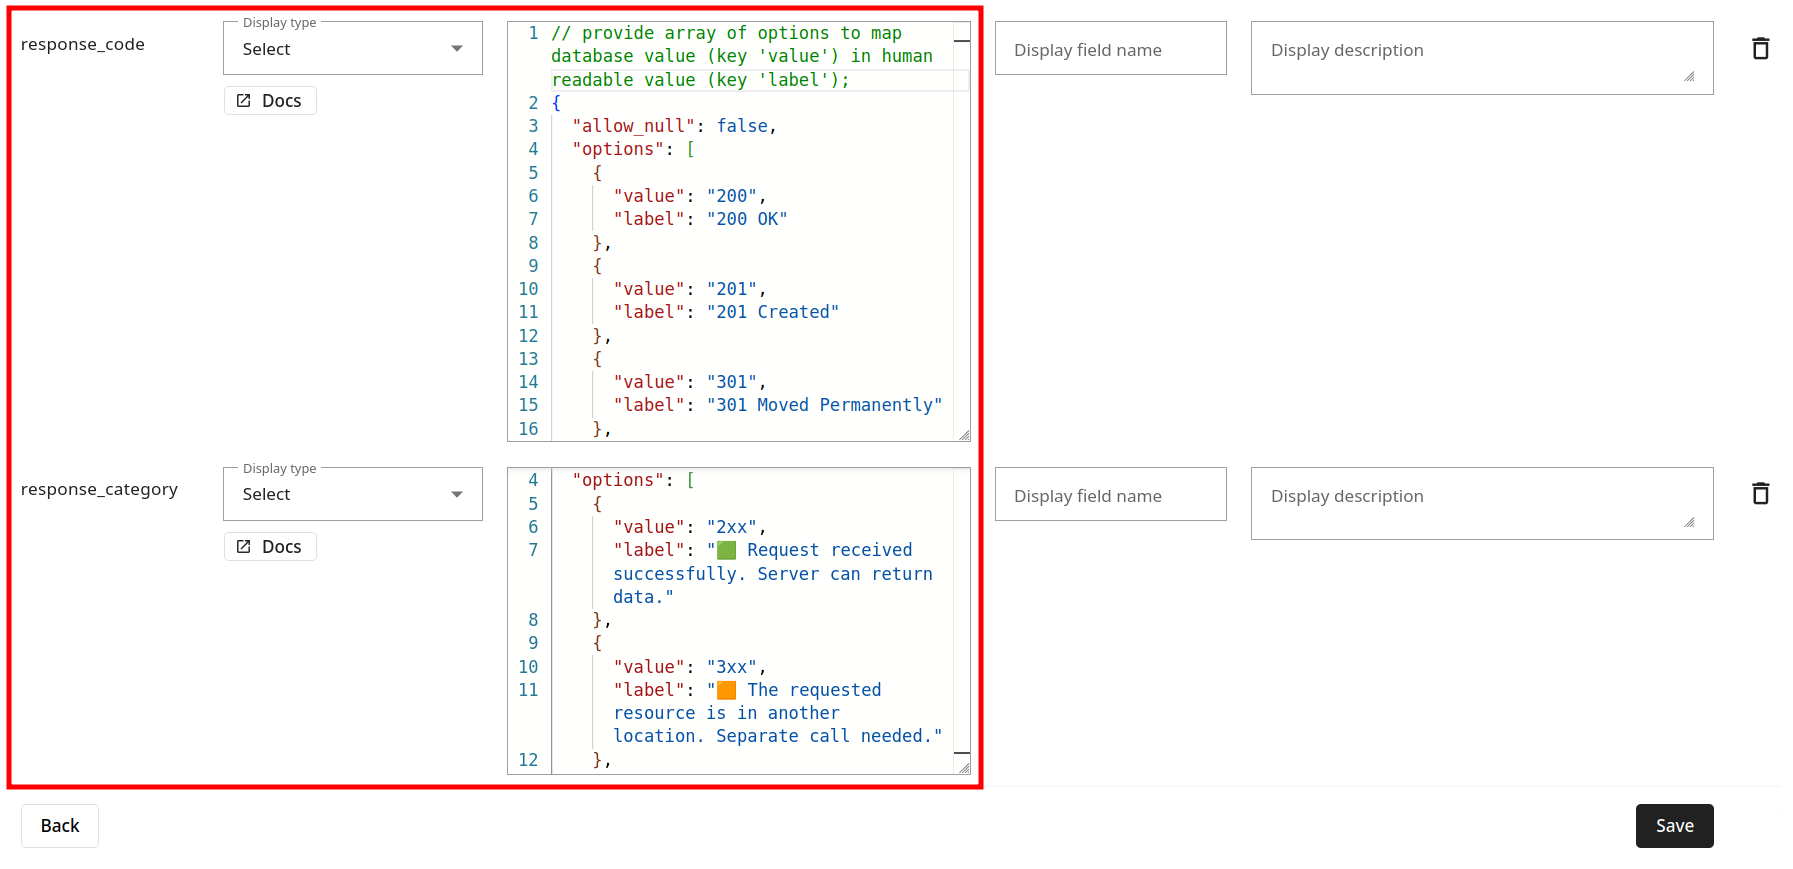
// provide array of options to map database value (key 'value')
// in human readable value (key 'label');
// for example:
// 500 => 500 Internal Server Error
{
  "allow_null": false,
  "options": [
    {
      "value": "500",
      "label": "500 Internal Server Error"
    }
  ]
}
Example:
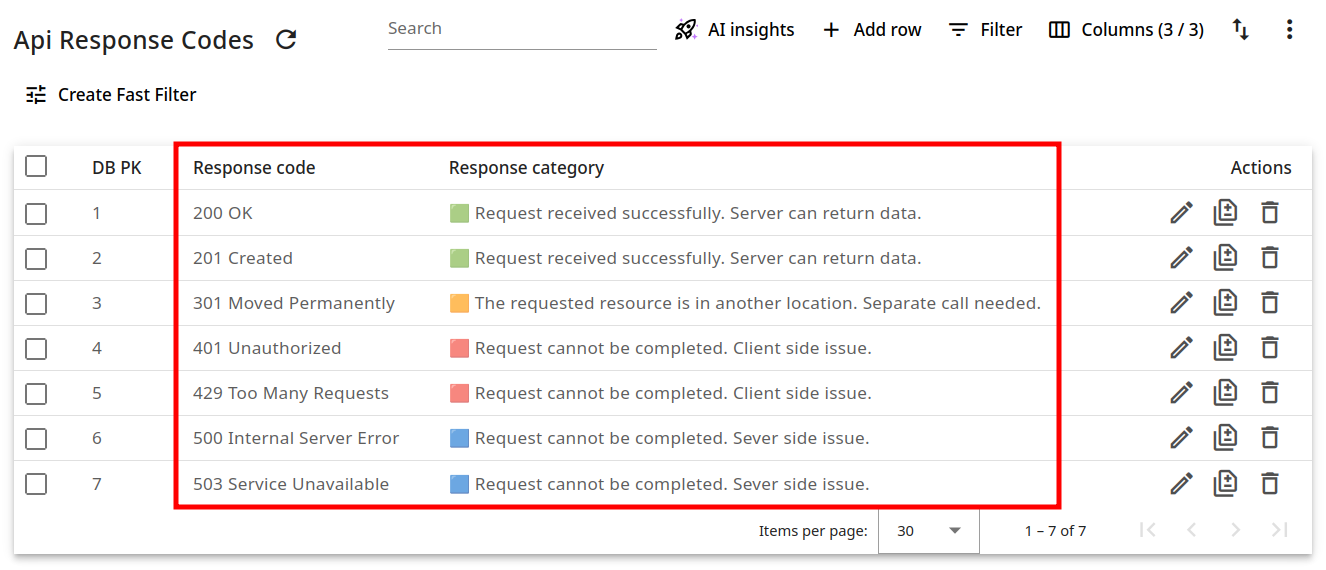
Considering the following database settings:
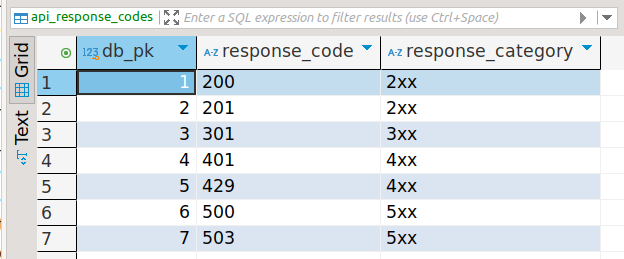
Without applying the Select widget, your database will look as follows (main and edit view):
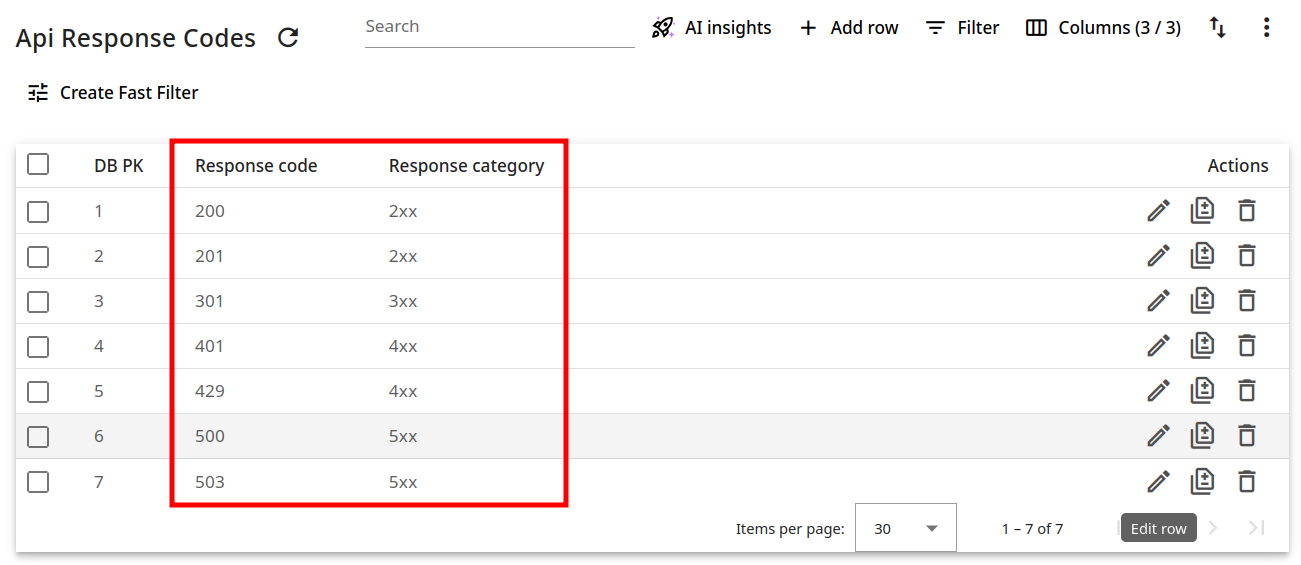

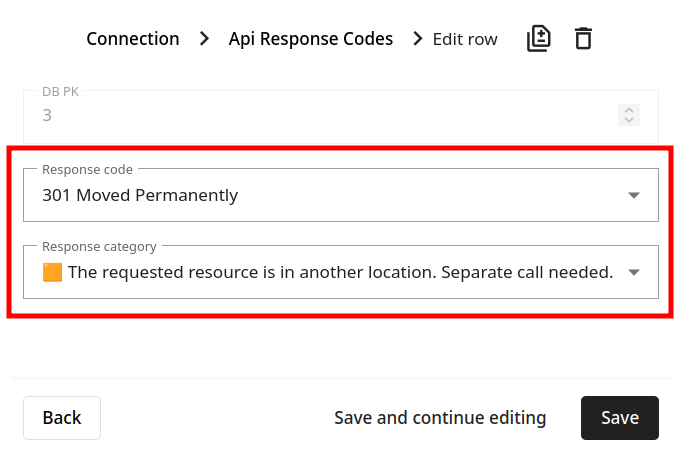
Once you have set up the widget,
the values in the database fields will remain unchanged, yet they will appear in a more readable format (main and edit view where you can even change values using the dropdown menus):
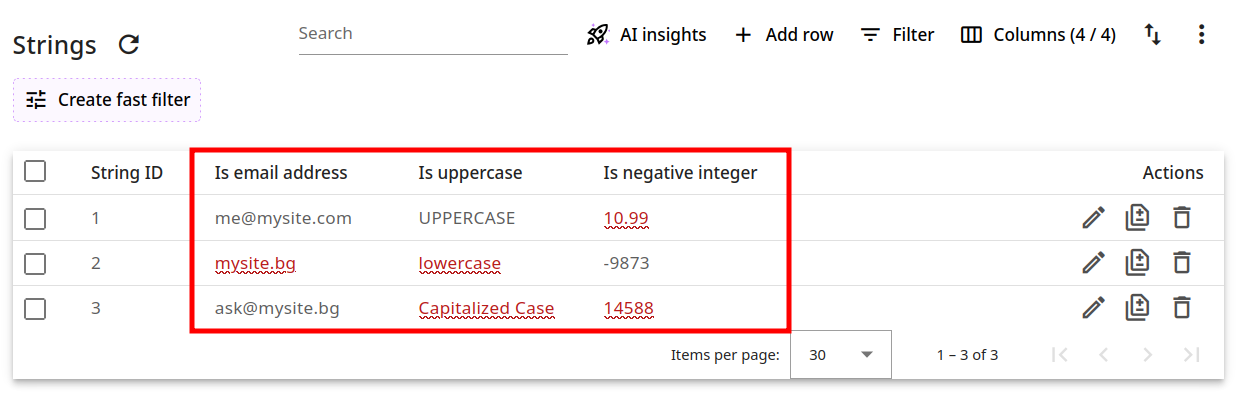
String
With the help of this widget you can validate string values using the methods of the following library: https://github.com/validatorjs/validator.js. In addition, you can set regex as validate parameter and define custom pattern matching expression.
// Optional validation for string values
// validate: Any validator.js method (e.g., "isEmail", "isURL", "isUUID", "isJSON", "isAlpha", "isNumeric")
// Full list: isEmail, isURL, isMACAddress, isIP, isIPRange, isFQDN, isBoolean, isIBAN, isBIC,
// isAlpha, isAlphanumeric, isNumeric, isPort, isLowercase, isUppercase, isAscii, isBase64,
// isHexadecimal, isHexColor, isRgbColor, isHSL, isMD5, isHash, isJWT, isJSON, isUUID,
// isMongoId, isCreditCard, isISBN, isISSN, isMobilePhone, isPostalCode, isEthereumAddress,
// isCurrency, isBtcAddress, isISO8601, isISO31661Alpha2, isISO31661Alpha3, isISO4217,
// isDataURI, isMagnetURI, isMimeType, isLatLong, isSlug, isStrongPassword, isTaxID, isVAT
// OR use "regex" with a regex parameter for custom pattern matching
{
  "validate": null,
  "regex": null
}
Example:
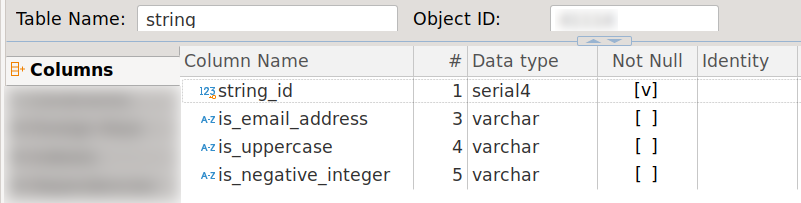
Considering the following database settings:

Without applying the Select widget, your database will look as follows:
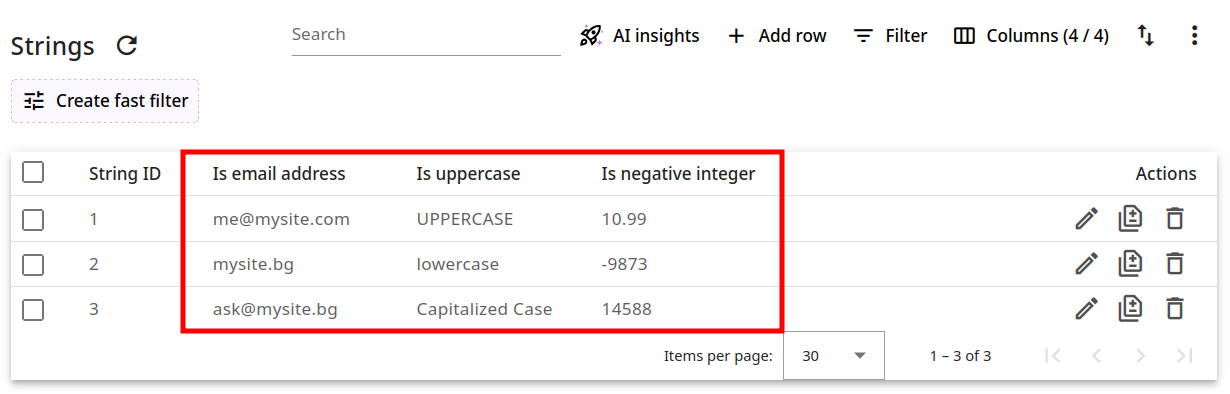
Once you have set up the widget,
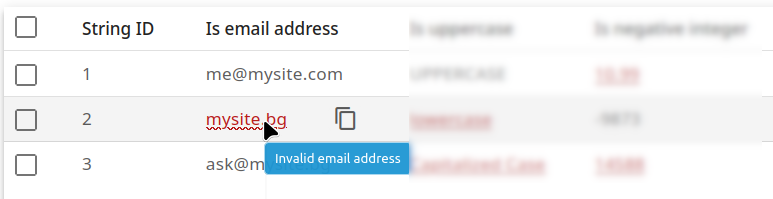
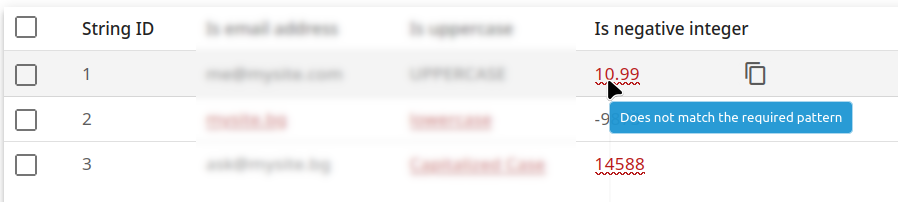
the values which do not match the required pattern are highlighted in red:
And hovering the mouse over an invalid value triggers the display of a relevant message:
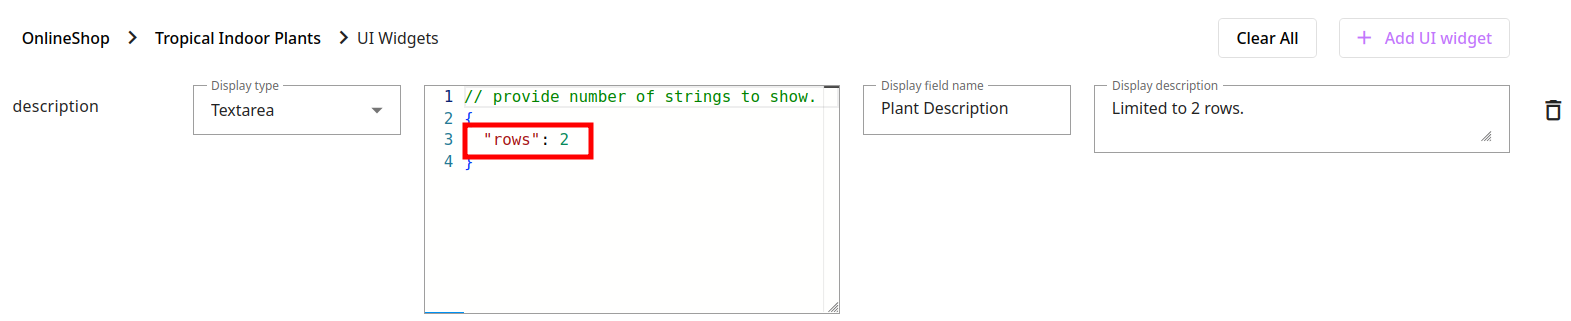
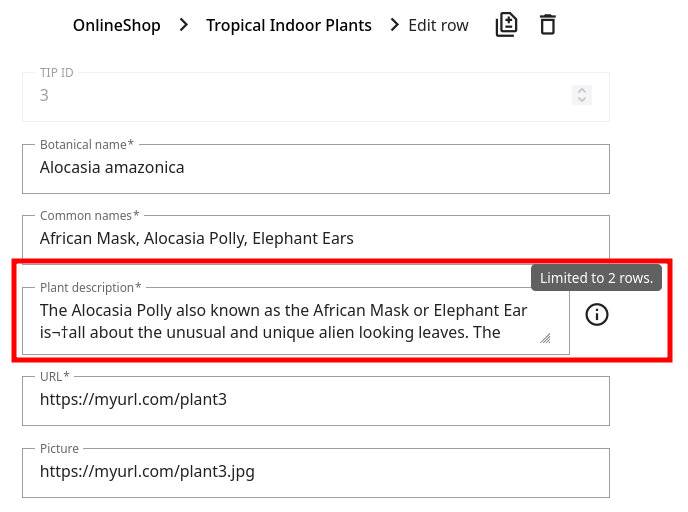
Textarea
You have the option to limit the size of the text area by setting a default number of rows (lines) to be visible. The remaining text can be reviewed by scrolling down or by expanding the area from the bottom right corner.
// provide number of strings to show.
{
  "rows": 2
}
Example:
URL
The URL widget is useful in cases when you do not have web address prefixes in a database column, but still you want to include them without making any permanent modifications.
// prefix: optional URL prefix to prepend to the href
// example:
{
  "prefix": "https://example.com/"
}
Example:
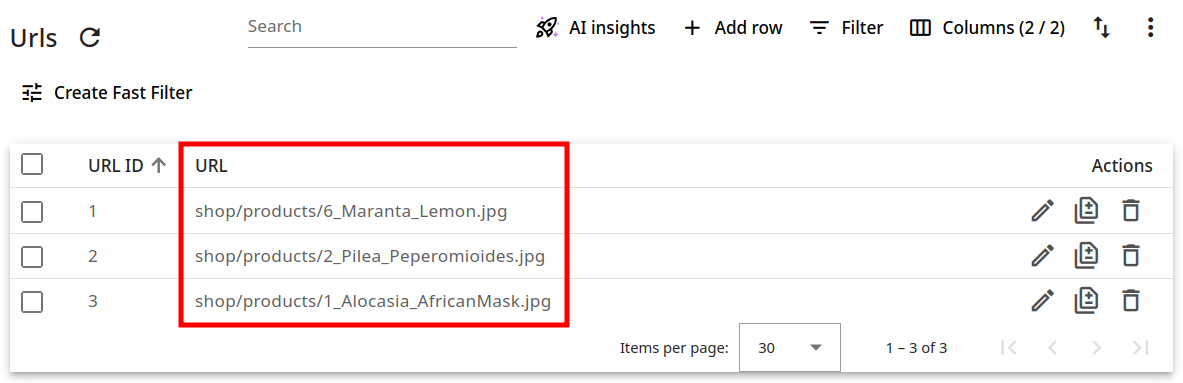
Considering the following database settings:
Without applying the URL widget, your database will look as follows (main and edit view):
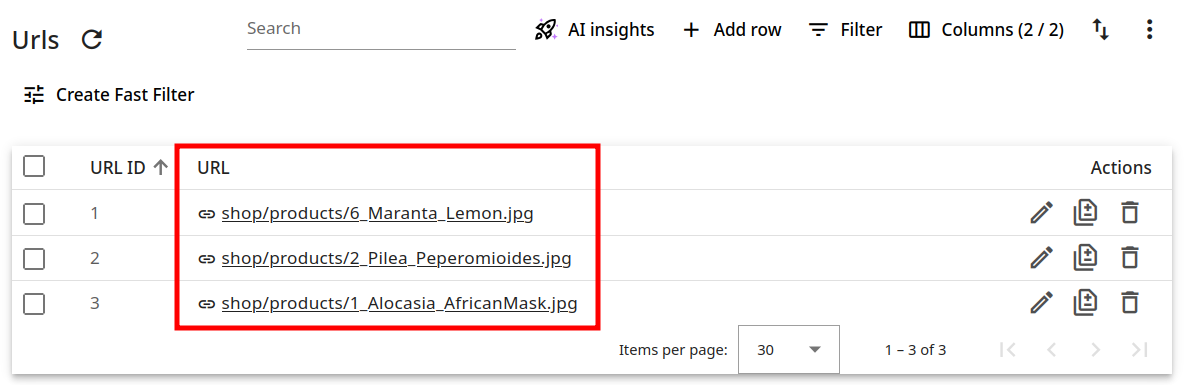
And after you configure the widget:

the values in the database fields will remain unchanged, yet they will appear as links:
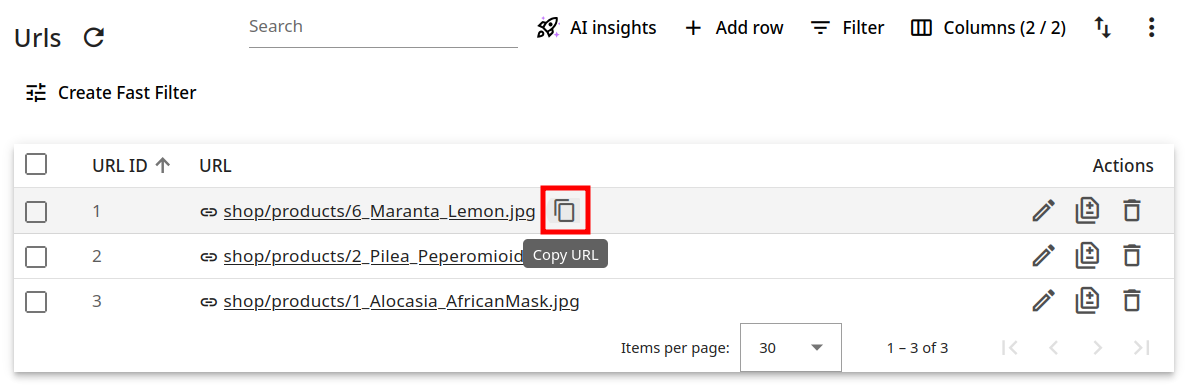
You can click on a link to open it in your browser or move the mouse over to display the copy URL icon :
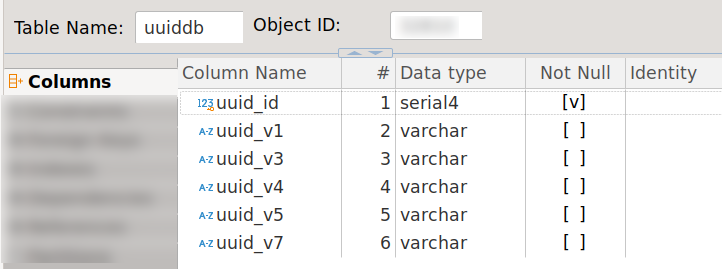
UUID
The Universally Unique Identifier (UUID) is a 128-bit value that serves to uniquely identify information within computer systems. There are various types of UUIDs, each created using slightly different methods. Some versions include timestamp data, while others depend on random values. In Rocketadmin, using the UUID widget, you can transform your string values into the UUID versions v1, v3, v4, v5 and v7 which we support.
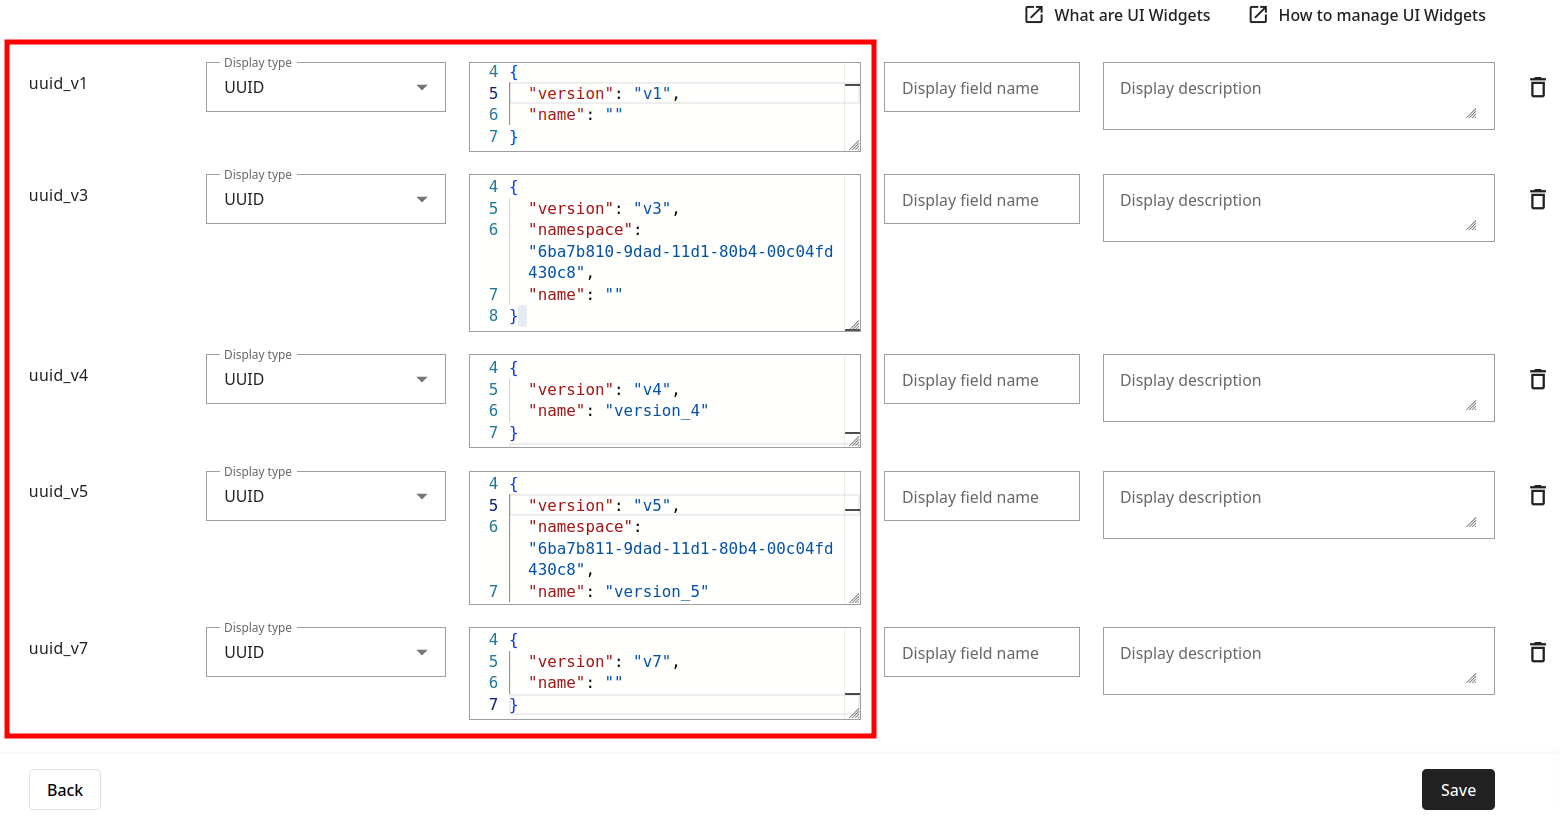
// Configure UUID generation version and parameters
// Available versions: "v1", "v3", "v4" (default), "v5", "v7"
// For v3/v5: provide namespace and optionally name
{
  "version": "v3",
  "namespace": "6ba7b810-9dad-11d1-80b4-00c04fd430c8",
  "name": ""
}
For versions v3 and v5, if you use the same namespace with the same name, it will always result in the generation of the same UUID.
Example:
Considering the following database settings:

Without applying the UUID widget, your database will look as follows:

And after you configure the widgets:
the values in the database fields will remain unchanged, yet they will appear in a condensed font:

And if you open a record for editing by clicking on , then the icon will be displayed next to each field with configured UUID widget:
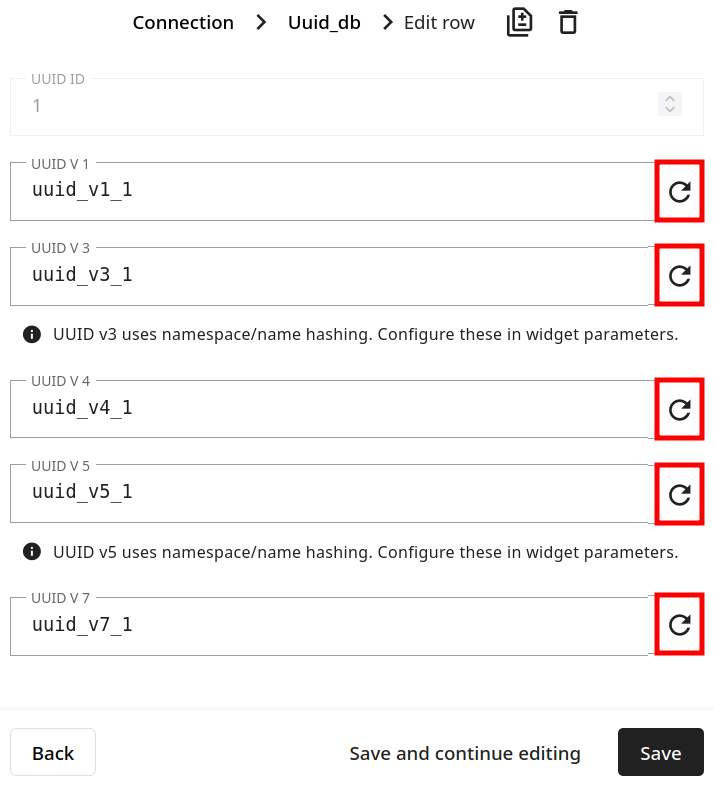
Click on each of them to review the generated UUID versions:
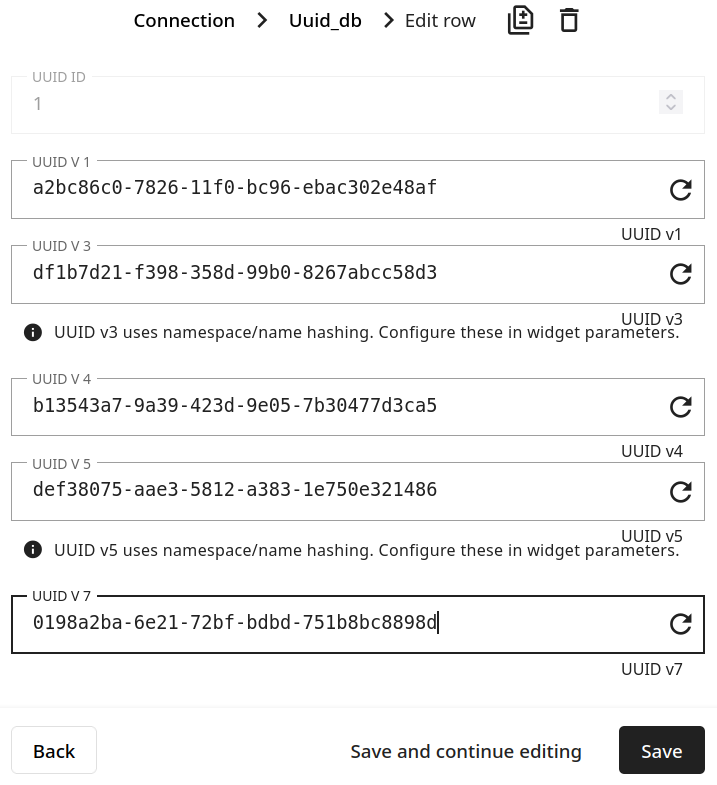
In case you want to keep the updated values in your database, simply click on Save to confirm.
S3
In certain scenarios, files need to be uploaded to an AWS S3 bucket while only their references (file name and path) are stored as table records.
To simplify this workflow, Rocketadmin provides the S3 widget, which allows you not only to upload files to your S3 bucket, but also to open them directly for review.
// Configure AWS S3 widget for file storage
// bucket: S3 bucket name (required)
// prefix: Optional path prefix for uploaded files
// region: AWS region (default: us-east-1)
// type: "file" (default) - accepts all file types, "image" - accepts only images
// aws_access_key_id_secret_name: Unique identifier of the secret containing AWS Access Key ID
// aws_secret_access_key_secret_name: Unique identifier of the secret containing AWS Secret Access Key
//
// IMPORTANT: DO NOT INCLUDE AWS SECRETS DIRECTLY IN WIDGET SETTINGS!
// Store your AWS credentials as secrets in Settings -> Secrets first,
// then reference them by their slug names in the settings below.

{
  "bucket": "your-bucket-name",
  "prefix": "uploads/",
  "region": "us-east-1",
  "type": "file",
  "aws_access_key_id_secret_name": "aws-access-key-id",
  "aws_secret_access_key_secret_name": "aws-secret-access-key"
}
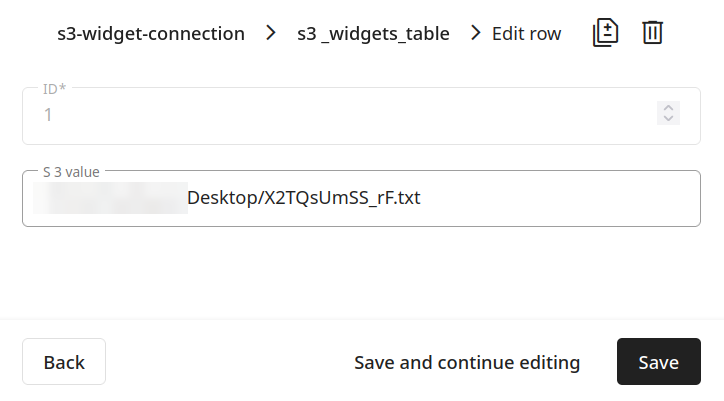
Without the widget, your database

and the S3 record will look as follows:

And after you configure the widget:

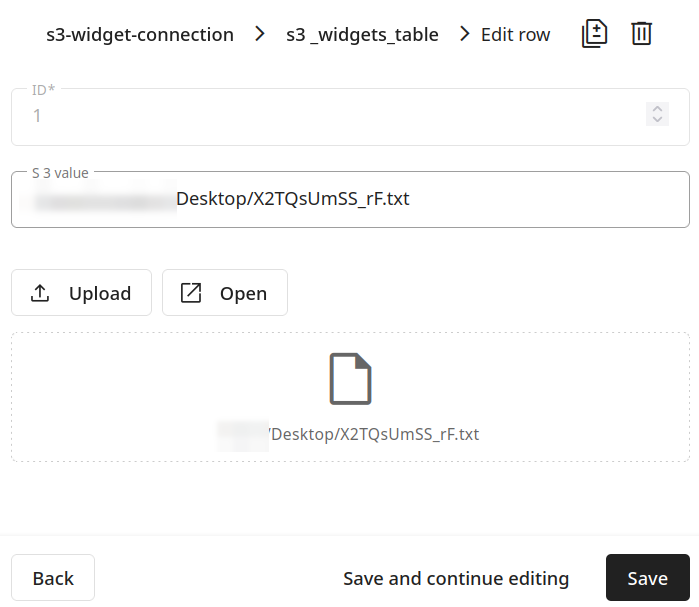
you will be able to upload and review your files.
Prerequisites - AWS configurations
Before using the S3 widget, you need to configure the following:
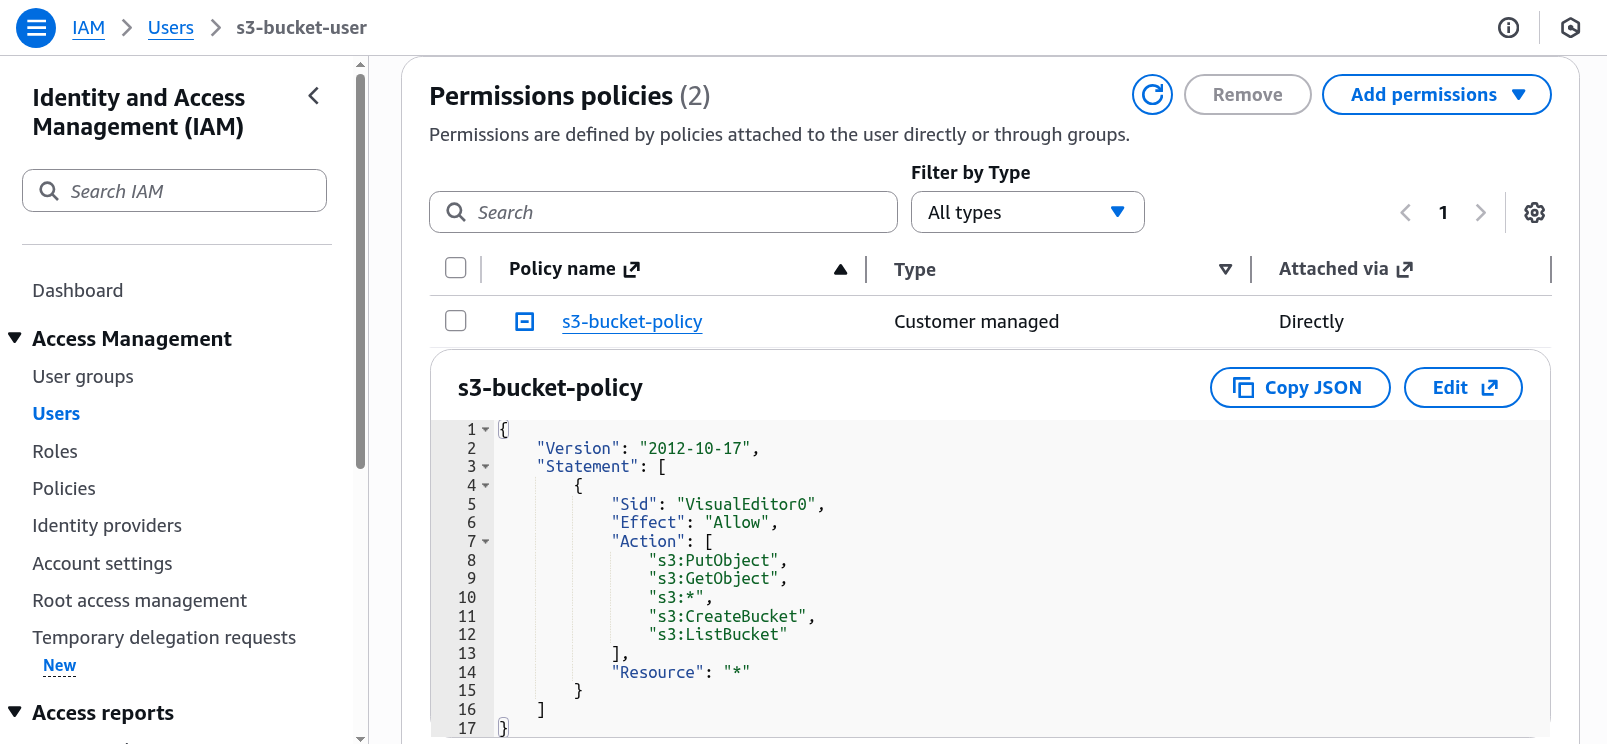
- An AWS IAM user with an access key
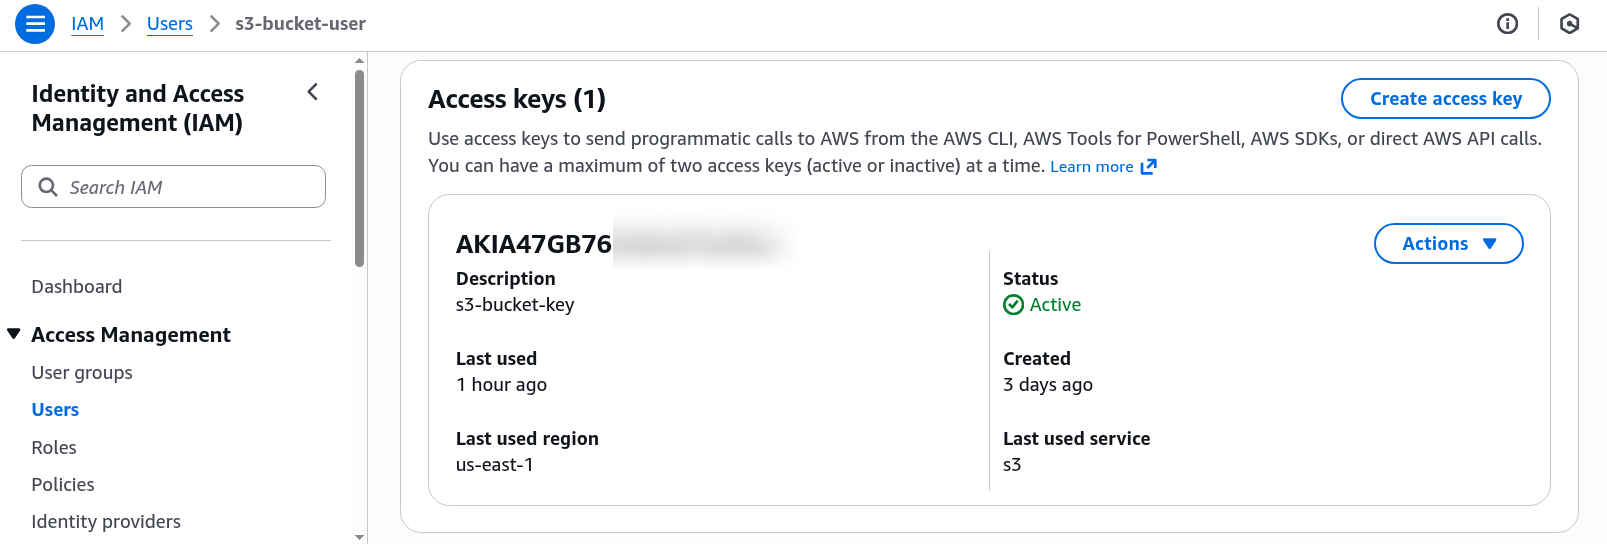
and the necessary permission policies (i.e. "s3:PutObject", "s3:GetObject", "s3:CreateBucket", "s3:ListBucket") for bucket management, for example:
- An AWS general purpose bucket
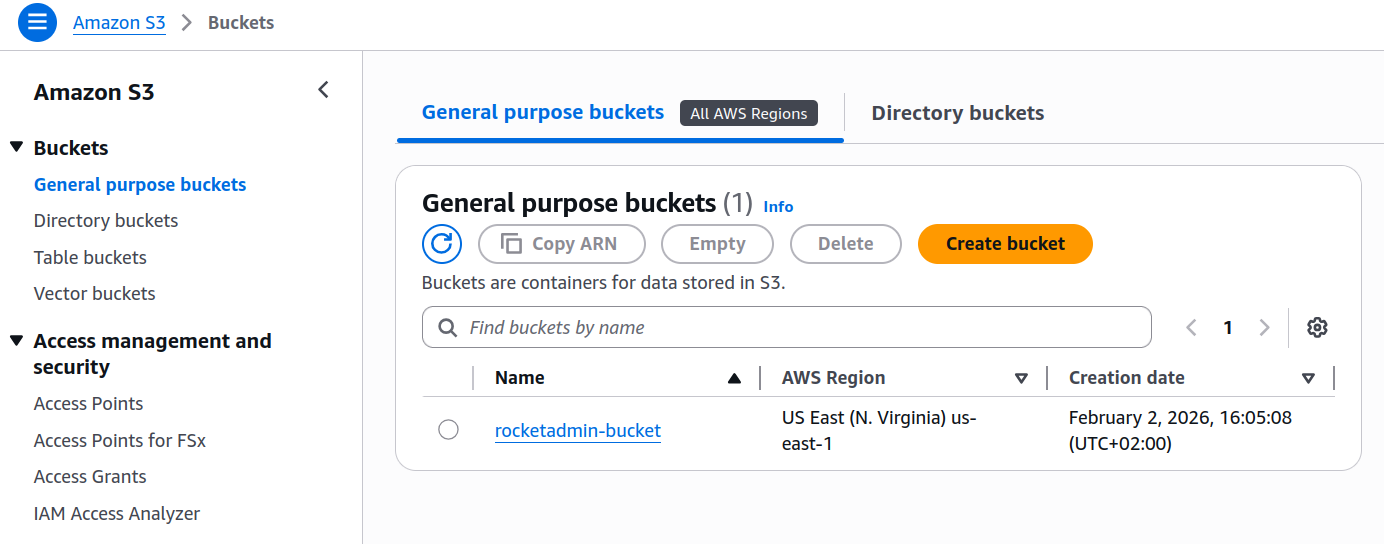
with the following Cross-Origin Resource Sharing (CORS) configuration:
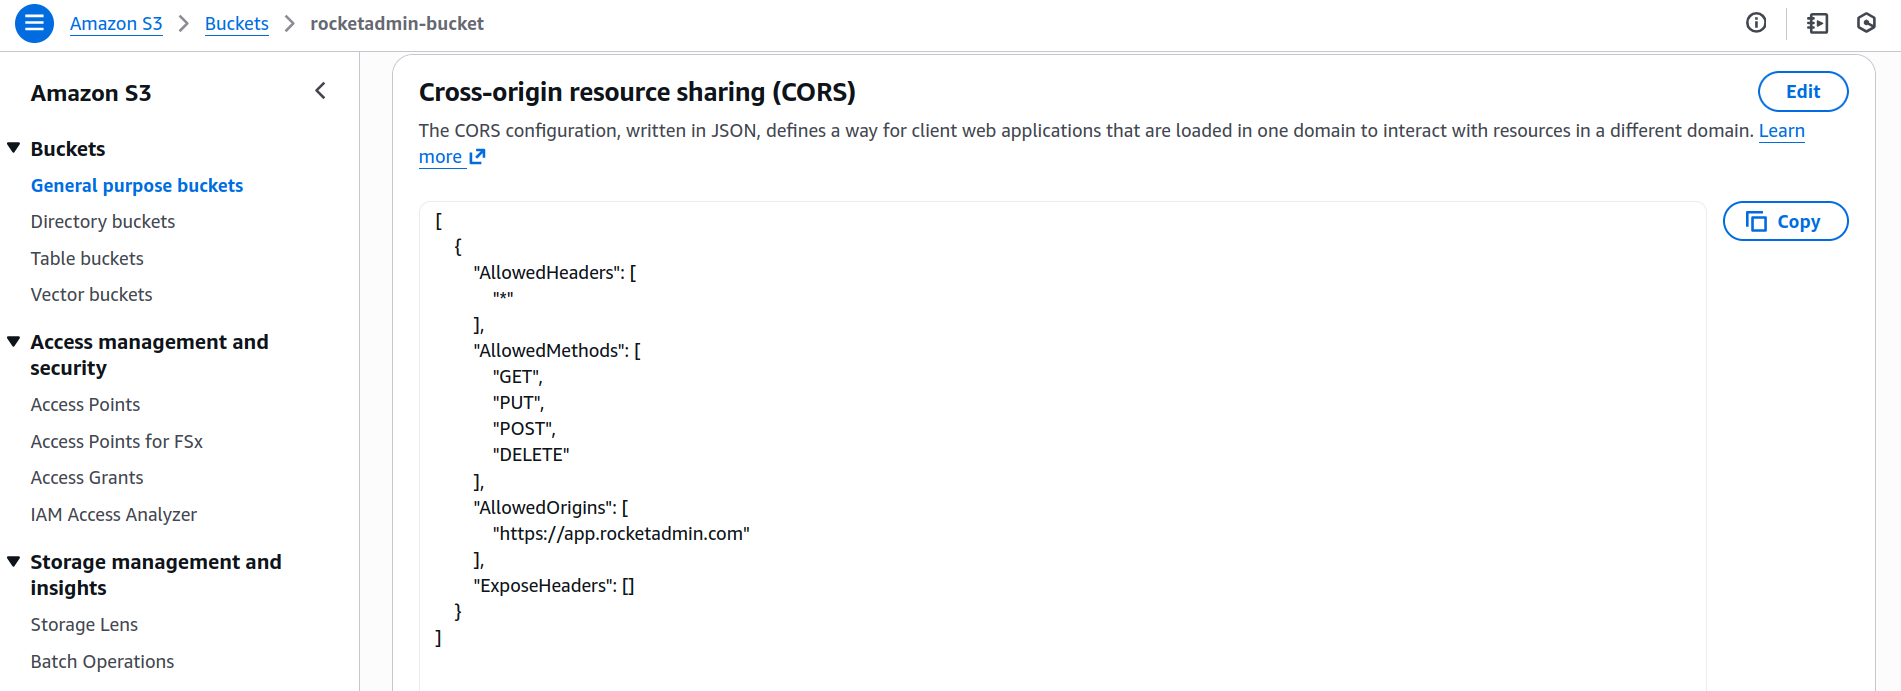
[
    {
        "AllowedHeaders": [
            "*"
        ],
        "AllowedMethods": [
            "GET",
            "PUT",
            "POST",
            "DELETE"
        ],
        "AllowedOrigins": [
            "https://app.rocketadmin.com"
        ],
        "ExposeHeaders": []
    }
]
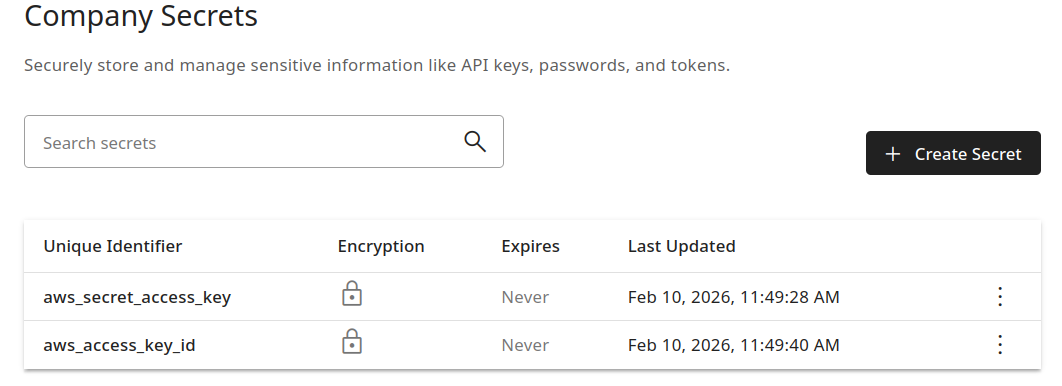
Rocketadmin configurations
-
Create two new secrets to store the AWS user's Access Key ID and Secret Access Key.
-
Provide the needed details in the S3 widget settings:
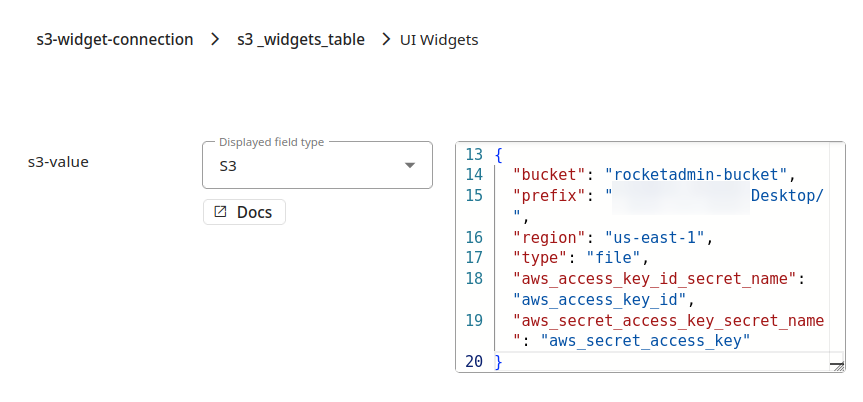
-
bucket - the name of the bucket you want to use
-
prefix - the prefix for the files you want to upload
-
region - the AWS region where your bucket is located
-
type - the type of the file
-
aws_access_key_id_secret_name - the name of the secret for the AWS Access Key ID
-
aws_secret_access_key_secret_name - the name of the secret for the AWS Secret Access Key
- Apply the changes.
To delete widgets
You can remove a single widget by clicking on the icon next to it or delete all the widgets at once by clicking on Clear All: